Part 1 — Getting Started
First-Time Setup
Subscription
The app requires an active Google Play subscription. On first launch you will see the subscription screen. Tap Subscribe Now to purchase, Restore Purchase if you have already subscribed on this or a previous device, or Redeem Code if you have a discount or promotional code. The subscription is managed through Google Play.
Permissions
After the subscription check, the app requests the following permissions. Granting them enables full functionality:
- Camera — required to take photos within the app
- Photos / Media — required to select images from your device gallery
- Notifications — required for survey reminders and import/export completion alerts
If you deny a permission, the app will offer a second prompt with an option to open system Settings to grant it there. You can continue without granting permissions, but the related features will not be available.
Terms & Conditions
Before creating your first survey or running the Setup Wizard, you will be prompted to accept the Terms & Conditions. Read through the terms, check I have read and accept, and tap I Accept. This is required once. Declining returns you to the home screen.
Setup Wizard
On first launch the app opens the Setup Wizard to walk you through entering your company, inspector, and lab information. The progress bar at the top shows Step X of 6. Every step is skippable — tap Skip to move past any step and fill it in later from Settings.
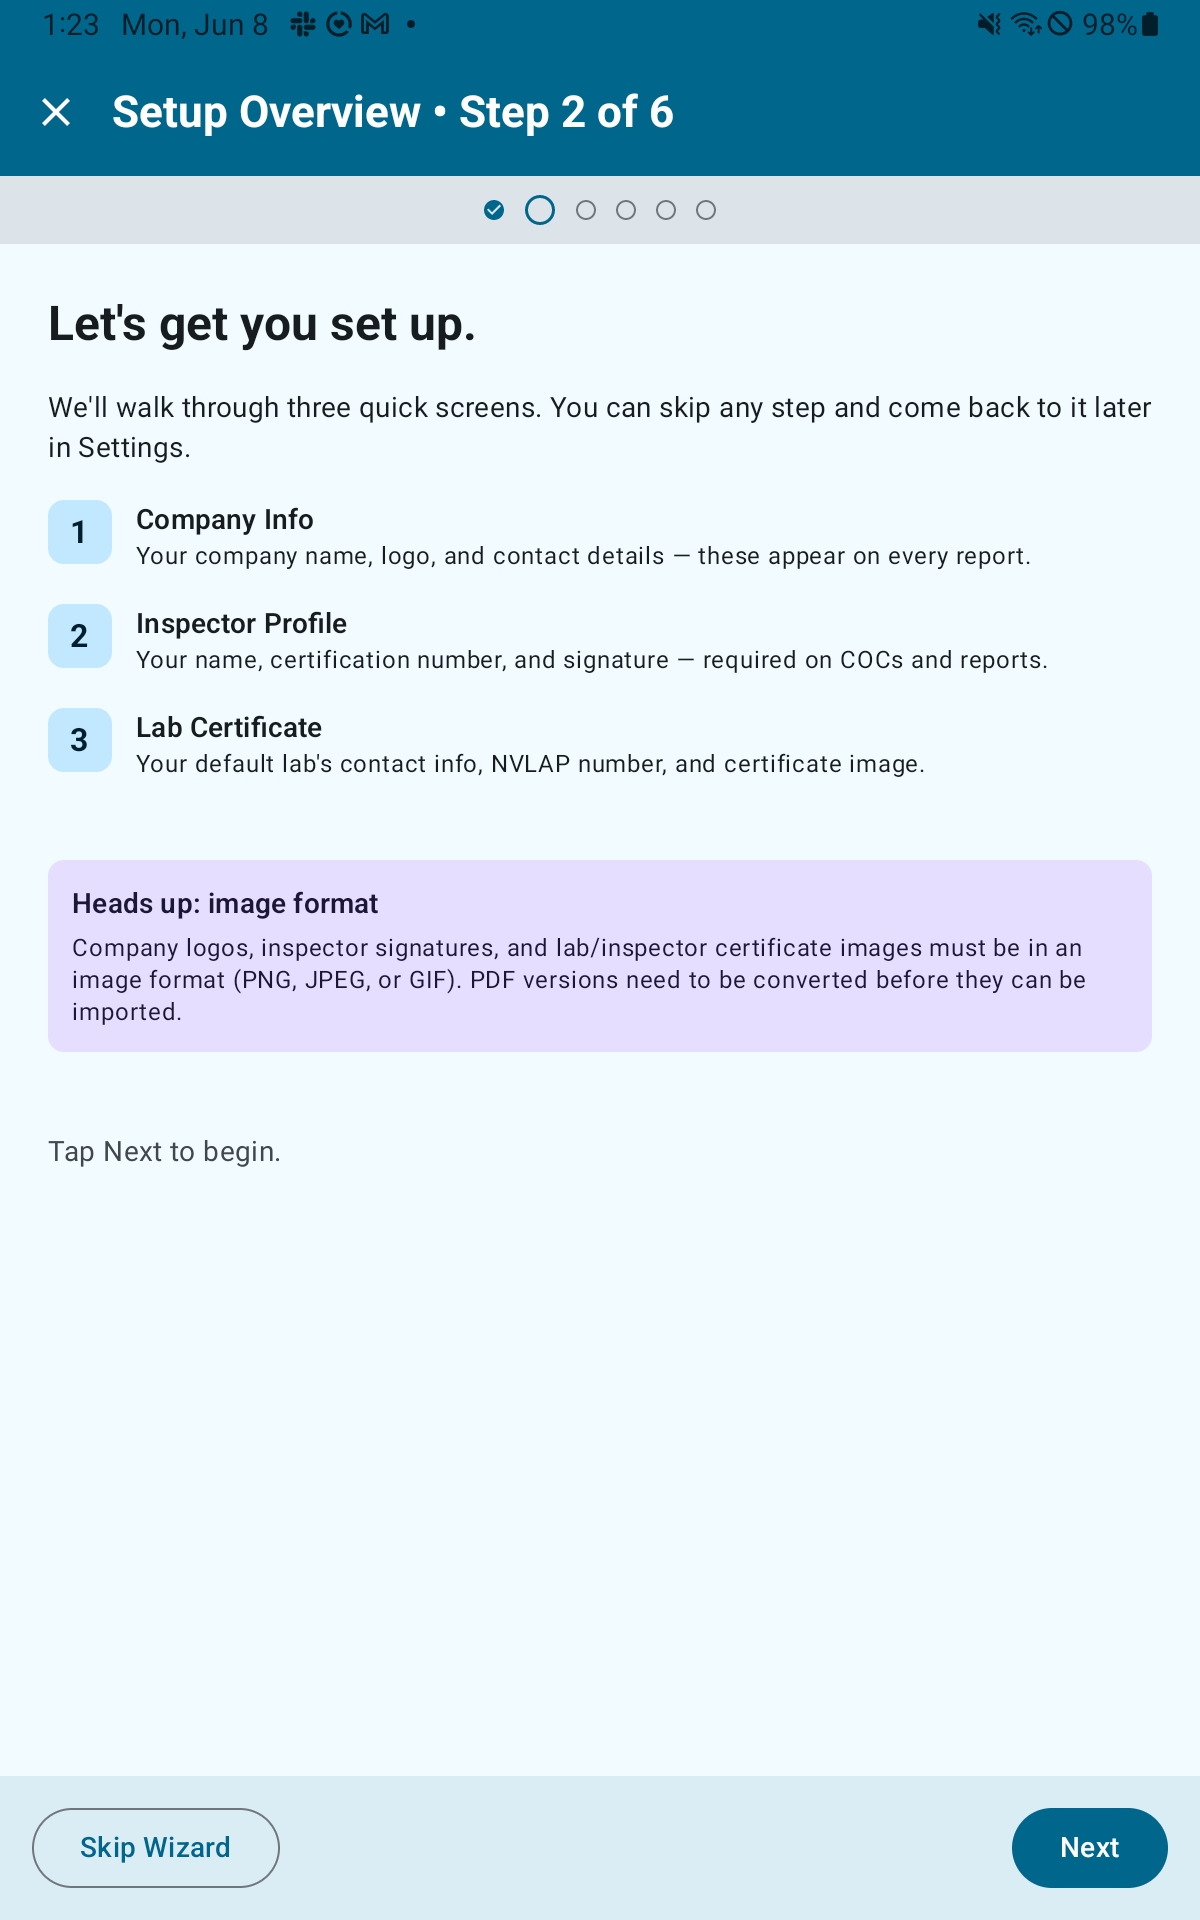
The six steps are:
- Welcome — choose “I’m a new user” to continue through the wizard, or “I’m an existing user” to skip the wizard entirely and restore a backup from Settings instead.
- Intro — overview of the three data steps that follow. Tap Next to continue or Skip Wizard to exit.
- Company Info — enter your Company Name (required to save), Address, Phone, and Email.
- Inspector Profile — enter the inspector’s Name and Certification Number (both required to save), plus optional Phone and Email.
- Lab Certificate — enter Lab Name (required to save), plus optional Label, NVLAP Number, Address, and Phone. The “Set as default lab” checkbox is checked by default.
- Done — a summary shows which steps were Saved, Skipped, or Not touched. Tap Finish to exit.
Note: The wizard collects text only. Certificate and signature images are added afterward from Settings → Manage Inspectors and Settings → Manage Certificates. Only PNG, JPEG, and GIF image formats are supported — PDFs must be converted to an image format before uploading. Signature images should use a plain white background — images with a transparent background may appear black in the report.
You can re-run the Setup Wizard at any time from Settings → Setup Wizard.
Navigating the App
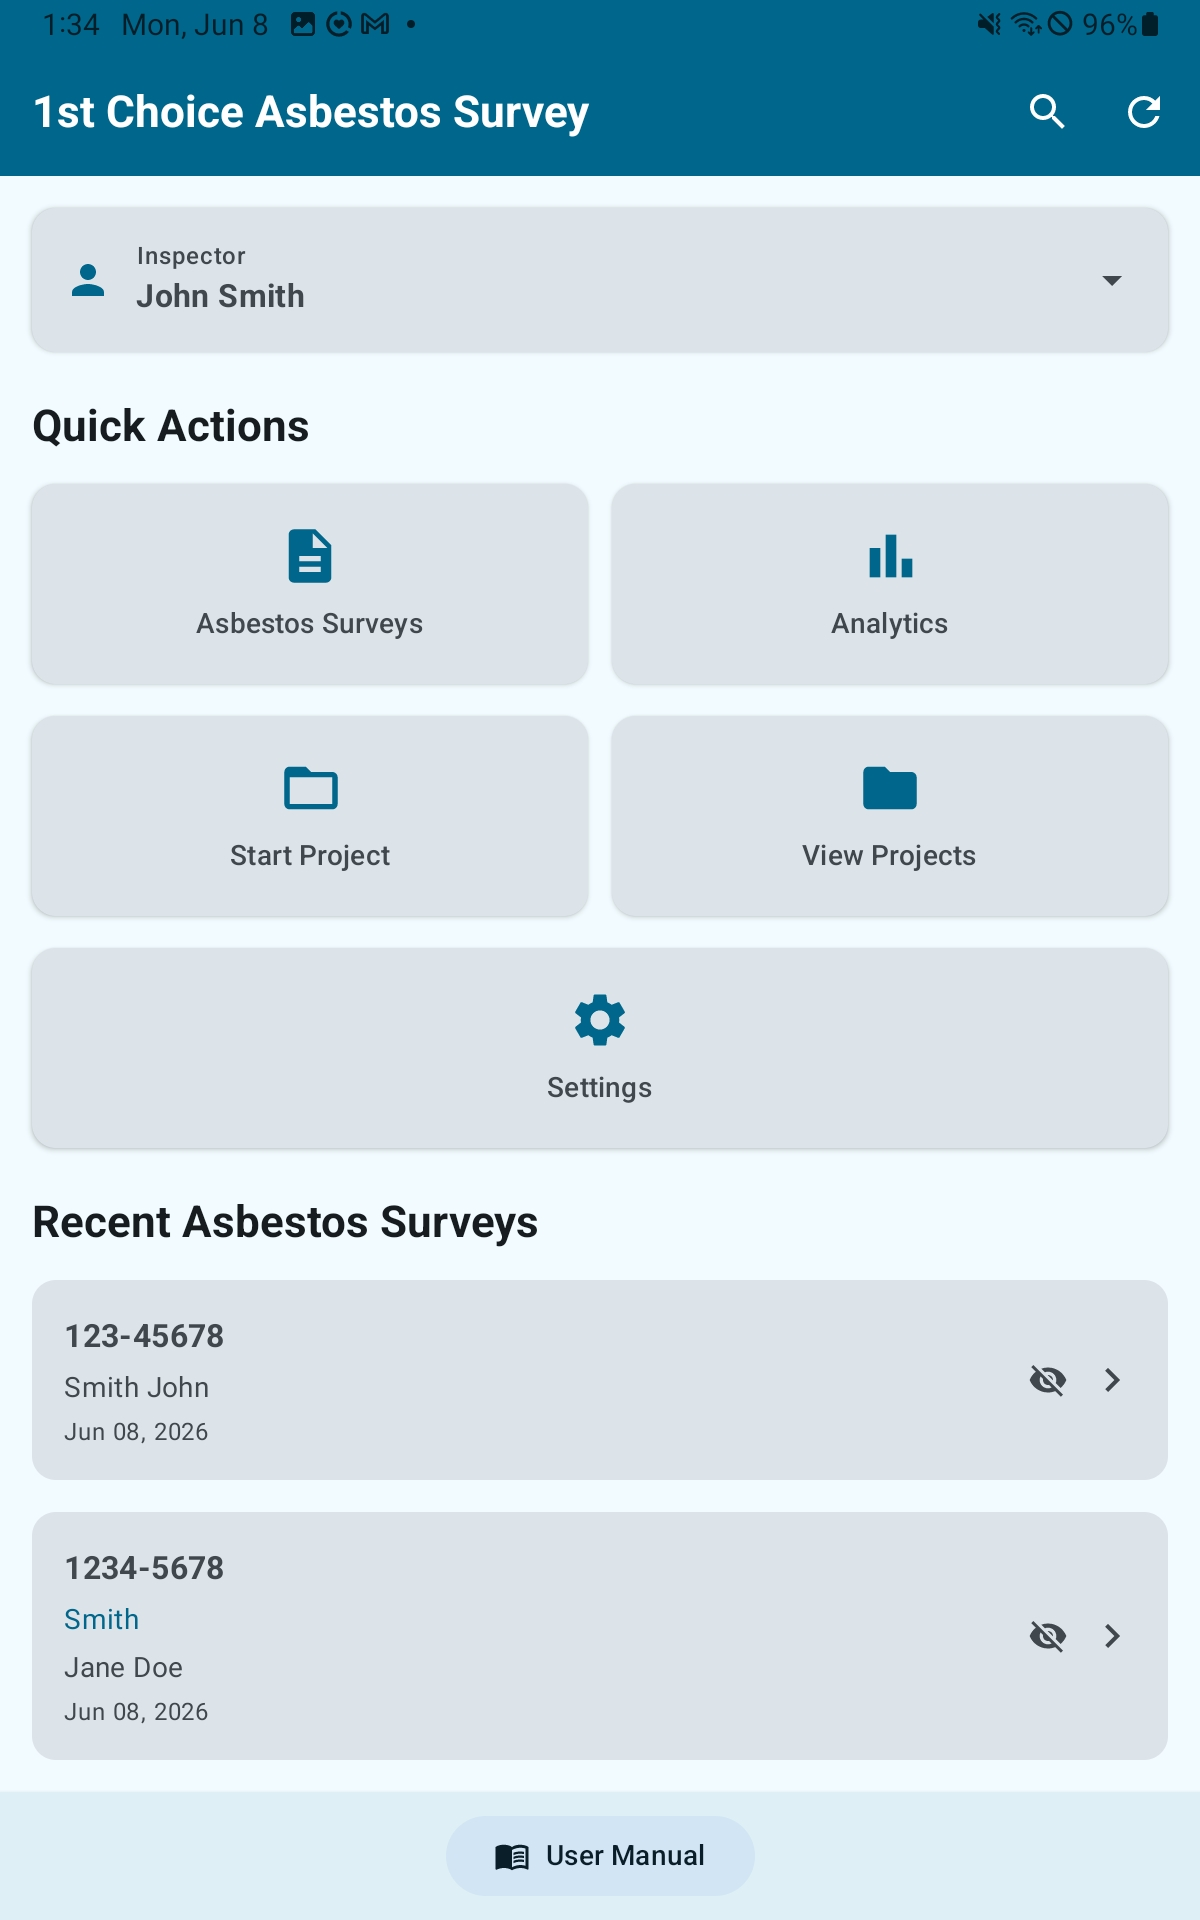
Home Screen
The home screen is your main launchpad. Once you have projects and surveys, it shows:
- Inspector selector — tap to switch between inspector profiles. The selected inspector is linked to new surveys you create.
- Quick Actions — cards for Asbestos Surveys, Analytics, Start Project, View Projects, and Settings.
- Recent Asbestos Surveys — the five most recent surveys. Tap a card to open it directly. Tap Hide to remove a survey from this list without deleting it; a Restore (N) button appears when surveys are hidden, letting you bring them back.
- Recent Projects — the five most recent projects, same pattern.
The top bar has a Search icon for searching across all surveys and a Refresh icon to reload dashboard counts. The bottom bar has a User Manual button that opens the on-device help documentation.
Auto-Save
All changes in the survey editor are saved automatically approximately 1.5 seconds after you stop making changes. The Save button in the action ribbon forces an immediate save if you want instant confirmation. You can adjust the auto-save delay (500–5,000 ms) or turn it off entirely in Settings → Auto-save.
Restore Points
The app automatically creates a snapshot of each survey every 5 minutes and before significant operations such as imports or deletions. To roll back to a previous state, tap the History (clock) icon in the Homogeneous Areas section header and select a restore point.
Part 2 — Projects & Surveys
What Are Projects?
A Project groups one or more surveys under a single project number. When you start a project, the app creates a corresponding folder on your device (under Documents by default) that can hold related files. That folder can be pre-configured with subfolders and template files that are created automatically for every new project — see Settings → Project Folder Setup.
Project Number
Required, at least 3 characters, auto-uppercased. Must be unique. Becomes the folder name on your device.
Project Name
Optional label (e.g., “Smith Residence”) displayed alongside the project number throughout the app.
Data hierarchy: One inspector → many projects → each project has one or more surveys → each survey contains Homogeneous Areas, samples, photos, and all narrative content for the report.
Creating & Managing Projects
Start a Project
- From the home screen tap the Start Project quick action card (or Start Your First Project if no projects exist yet)
- Enter a Project Number — at least 3 characters, required. This becomes the folder name on your device.
- Optionally enter a Project Name
- Tap Start

The app navigates to the Project Dashboard for the new project.
Project Dashboard
The Project Dashboard shows the project’s surveys, statistics, and files. From here you can:
- Create a new survey for this project or open an existing one
- Browse project files from the on-device project folder
- Rename Project — renames the folder on disk and remaps all stored file paths in the database
- Delete Project — removes all data. If any files cannot be deleted, the app lists those filenames so you can remove them manually.
- Hide the project from the Recent Projects list on the home screen (it is not deleted)
Creating a New Survey
- From the Survey List screen or a Project Dashboard, tap the + button
- Fill in the required fields: Project Number, Survey Date (defaults to today), Service Address, and Client Name
- Optionally add a Client Phone
- Tap Create Survey
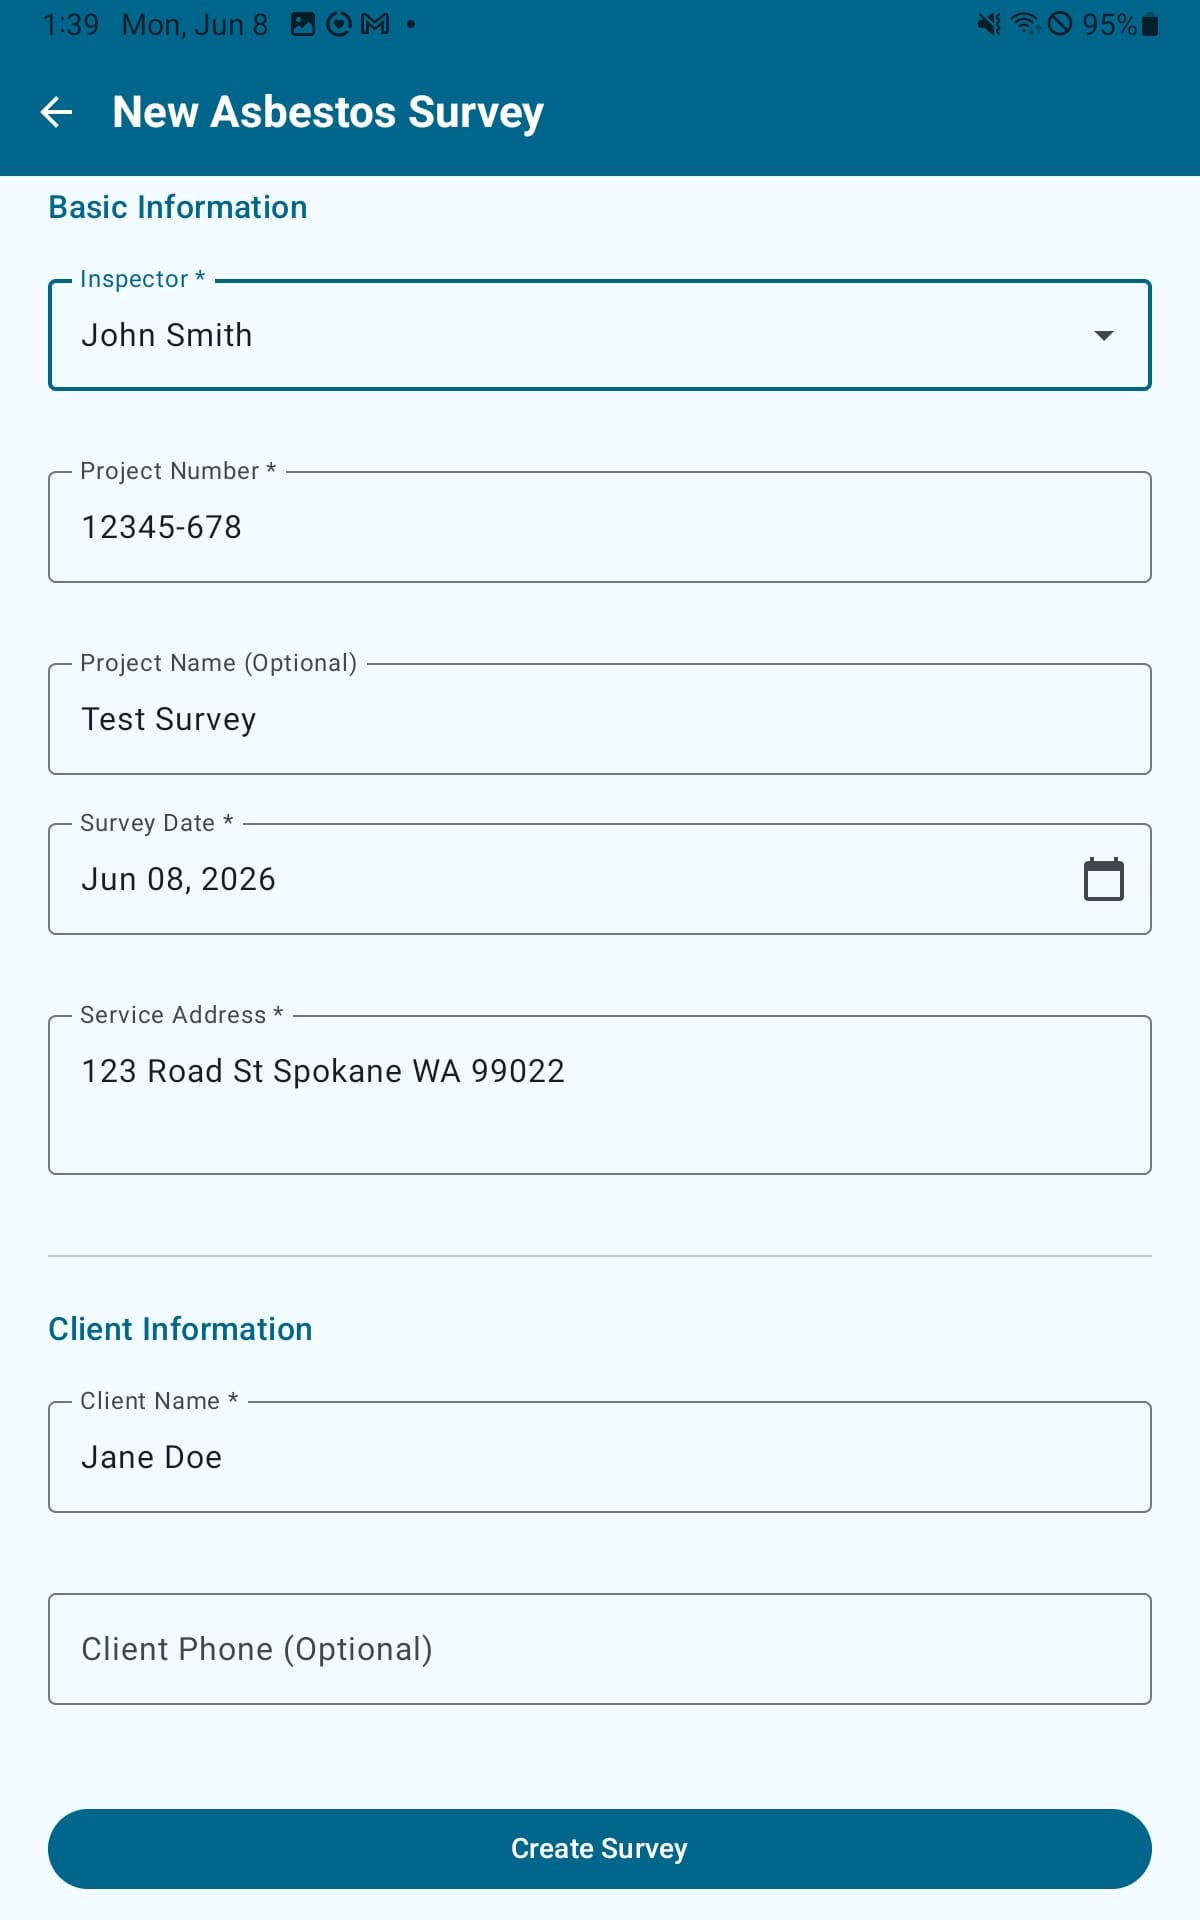
The app immediately opens the new survey in the editor. The survey is saved as Draft status.
Note: Project Numbers must be unique. If you enter a number that already exists, the app will alert you.
Survey List
Reach the survey list from the home screen by tapping the Asbestos Surveys quick action. Each card shows client name, service address, status badge, and creation date. Tap any card to open the survey editor. Long-press a card to enter multi-select mode for bulk deletion.
Filtering
Tap the Filter icon in the top bar (tinted when filters are active) to open the filter dialog. Available filters:
- Status — Draft, Complete, or both
- Inspector — restrict to surveys for a specific inspector
- Search Query — free-text search
Tap Clear Filters in the dialog to reset all filters.
Part 3 — The Survey Editor
Survey Editor Overview
The survey editor is a single scrolling screen with collapsible sections — not a tabbed layout. Tap any section header to expand or collapse it. Scroll freely to reach any part of the survey without switching views. All changes auto-save approximately 1.5 seconds after you stop typing.
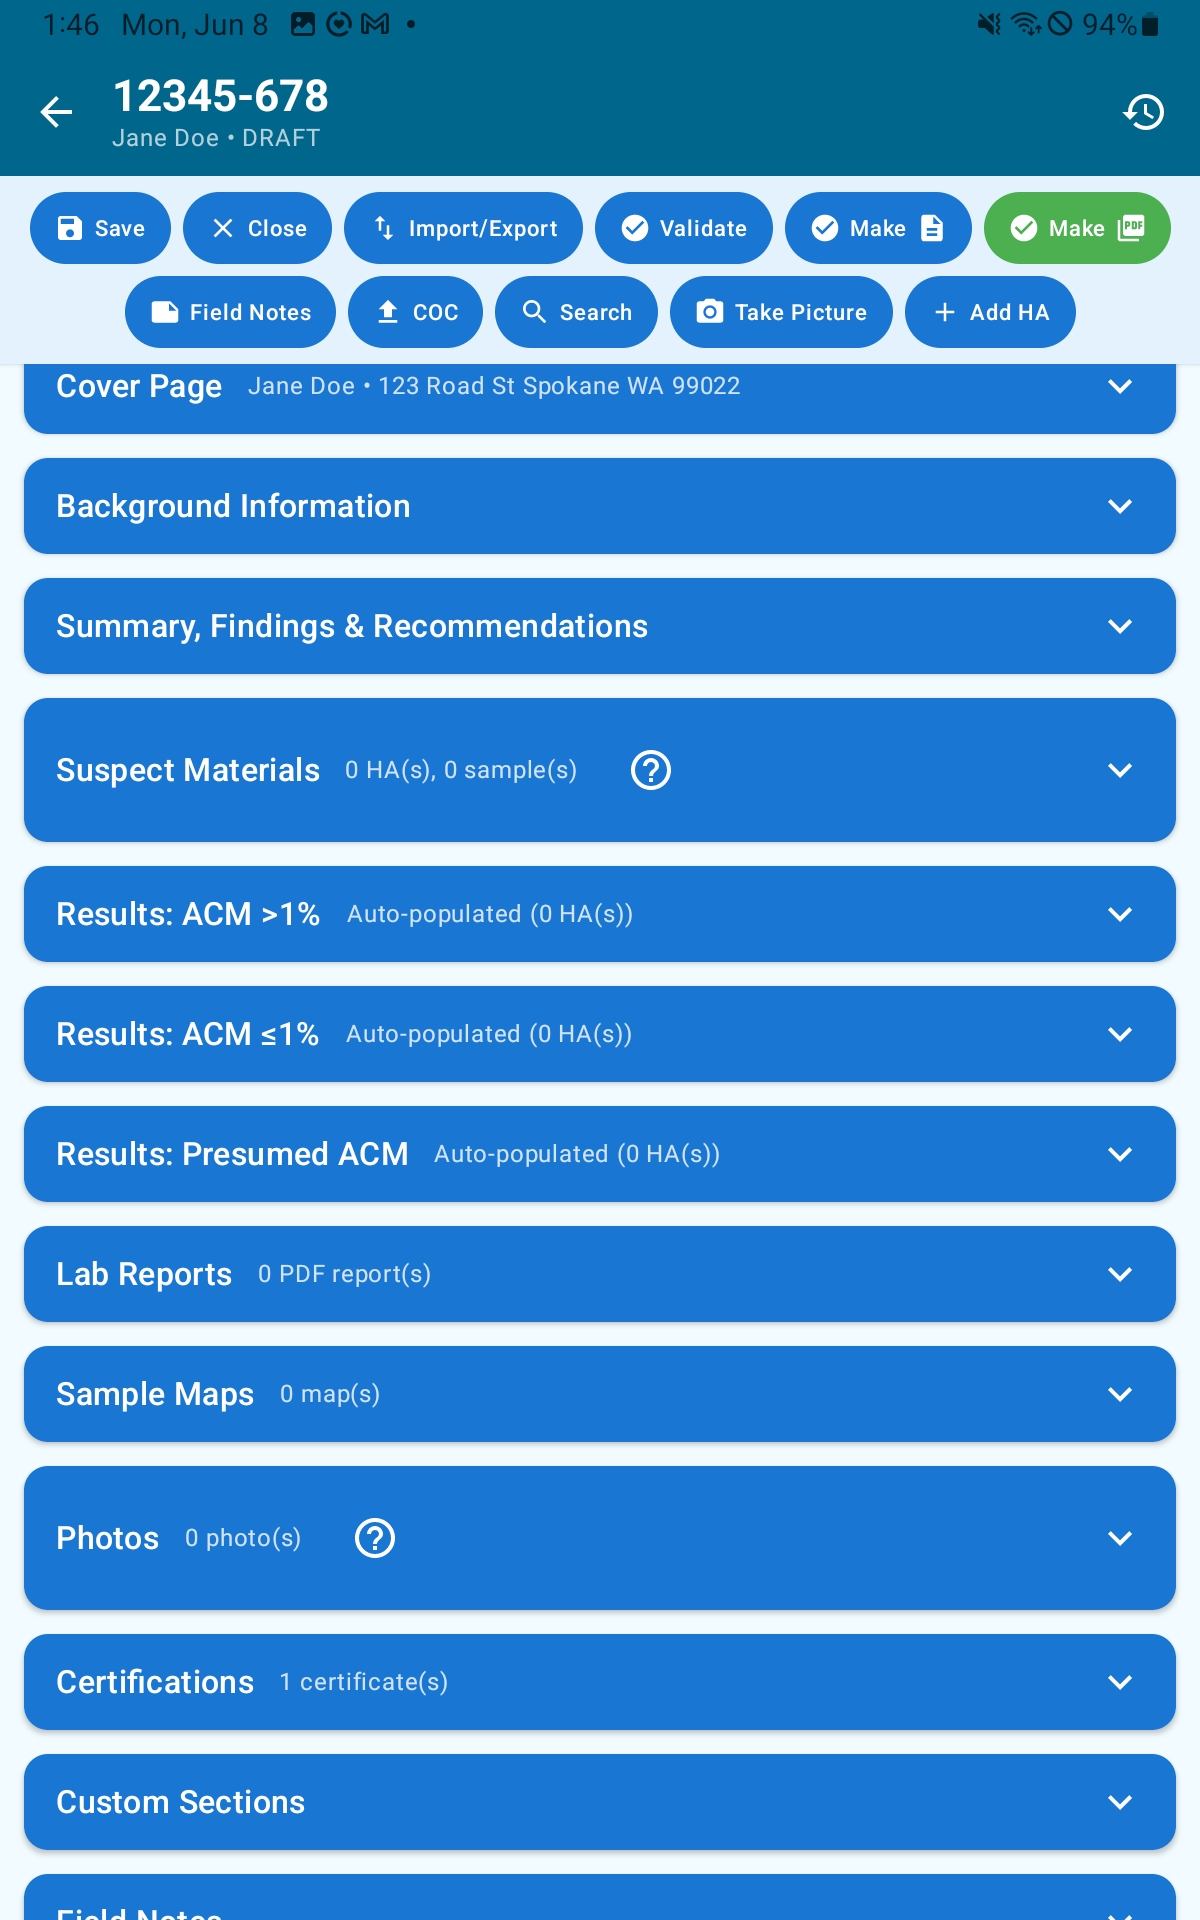
Sections appear in this order from top to bottom:
- Cover Page — client, property, dates, and inspector information for the report cover
- Background Information — narrative sections: reason for inspection, introduction, site description, scope, methodology, limitations
- Summary, Findings & Recommendations — auto-calculated ACM findings and your written recommendations
- Suspect Materials — all Homogeneous Areas (HAs) identified at the site
- Results: ACM >1% — auto-populated from HAs marked YES
- Results: ACM ≤1% — auto-populated from HAs marked ≤1%
- Results: Presumed ACM — auto-populated from HAs marked Presumed
- Lab Reports — lab result documents attached to samples
- Sample Maps — floor plans and site diagrams
- Photos — site, HA, and sample photos
- Certifications — inspector and lab certificate images
- Custom Sections — standard section visibility controls and user-defined sections
- Field Notes — private notes that never appear in any PDF
Action Ribbon
The action ribbon sits directly below the top app bar and stays visible as you scroll through the editor. It has two rows of buttons that give you quick access to all major actions without scrolling.
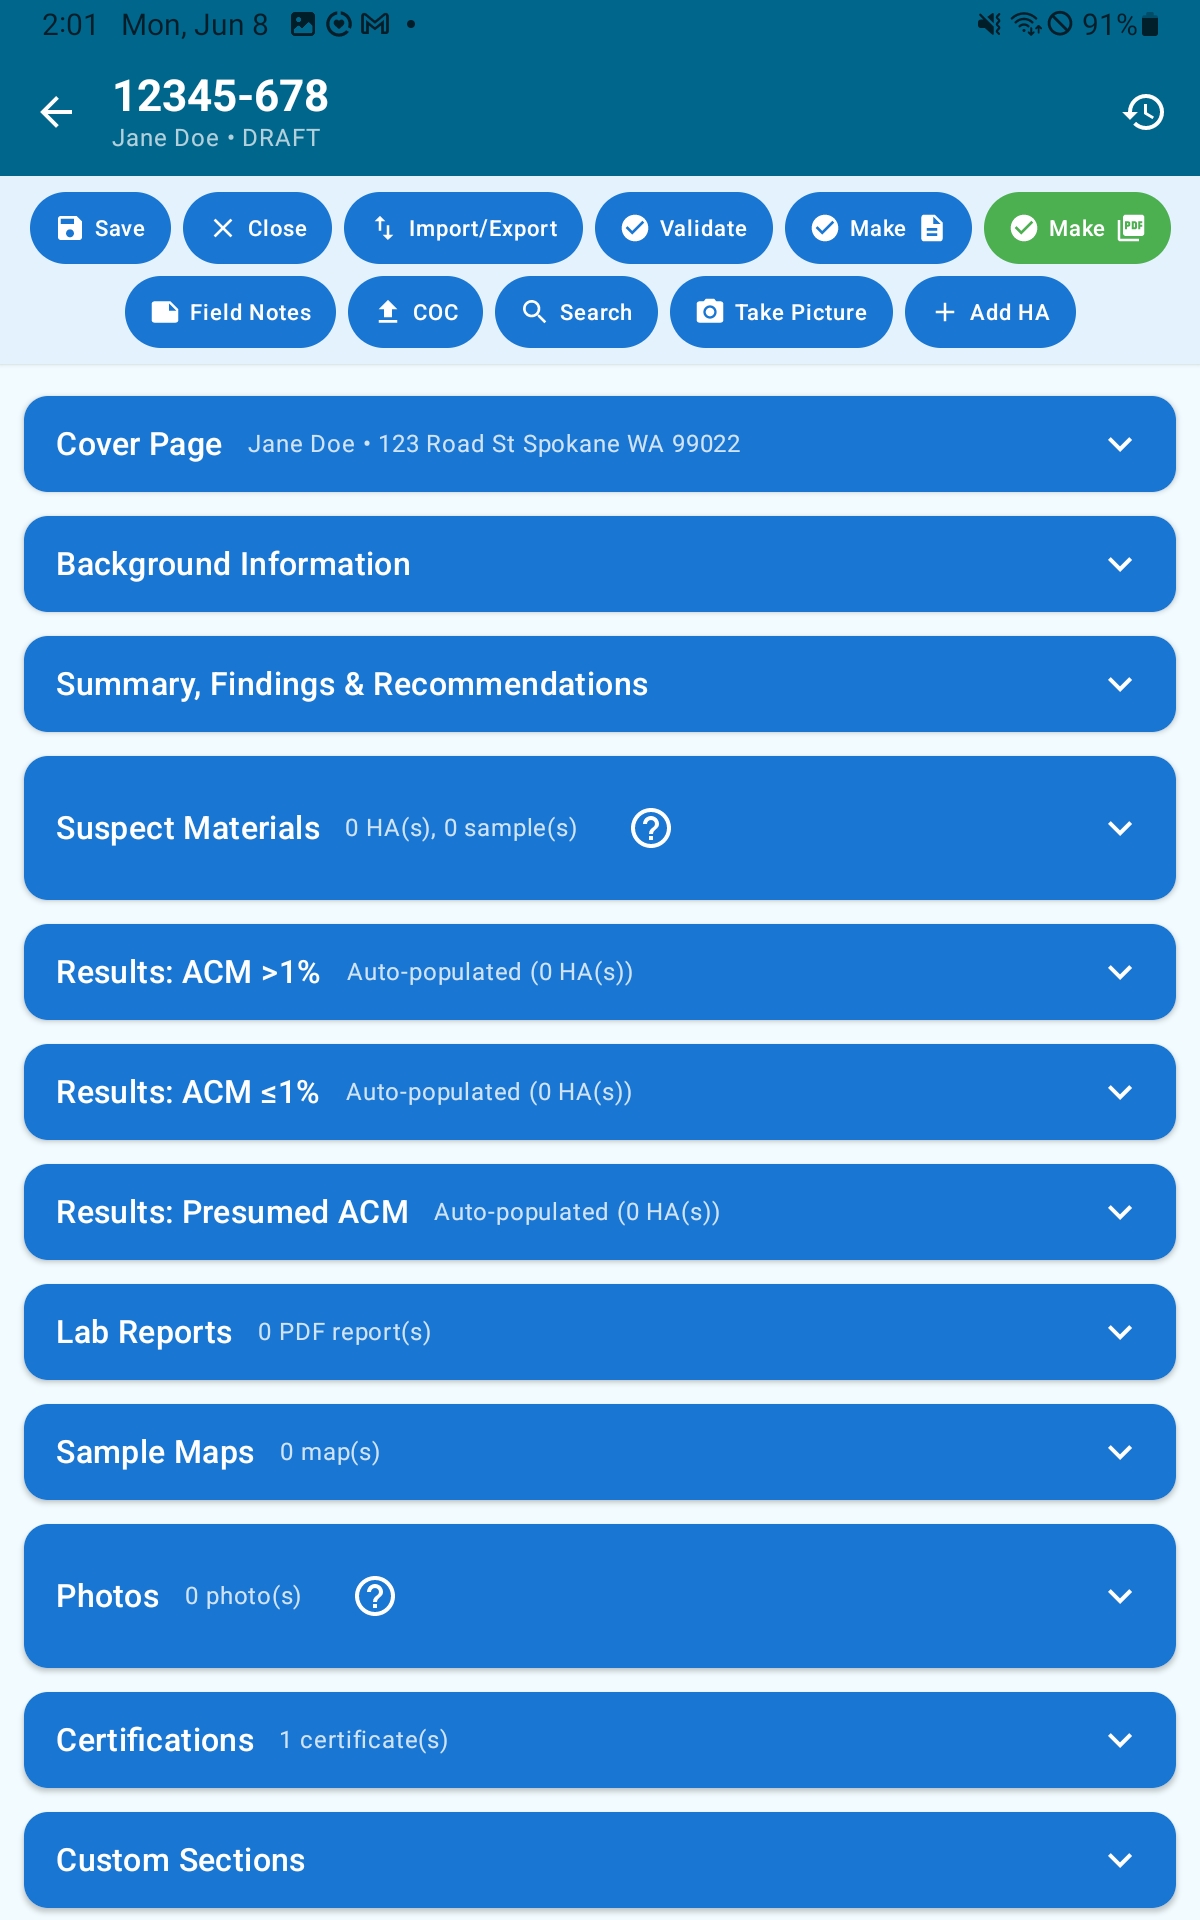
Row 1 — Core Actions
- Save — immediately writes all current changes to the database
- Close — saves and returns to the Project Dashboard
- Import / Export — opens the per-survey import/export dialog (see Survey Import & Export)
- Validate — checks that all required Background fields are filled in and shows an error listing any missing fields
- Make DOCX — generates a Microsoft Word version of the report
- Make PDF — generates the PDF report (see Generating the PDF)
Row 2 — Content Actions
- Field Notes — quick-add to private field notes without scrolling to that section
- CoC — opens the Chain of Custody export dialog (see Generating a COC)
- Search — search within the survey
- Take Picture — opens the photo capture sheet (Camera or Gallery)
- Add HA — opens the Add Homogeneous Area dialog
The back arrow in the top app bar saves and returns to the Project Dashboard.
Cover Page
The Cover Page section populates the first page of your PDF. The company logo, company name, and survey title are drawn from your Settings and shown at the top as read-only. All other fields are editable here.
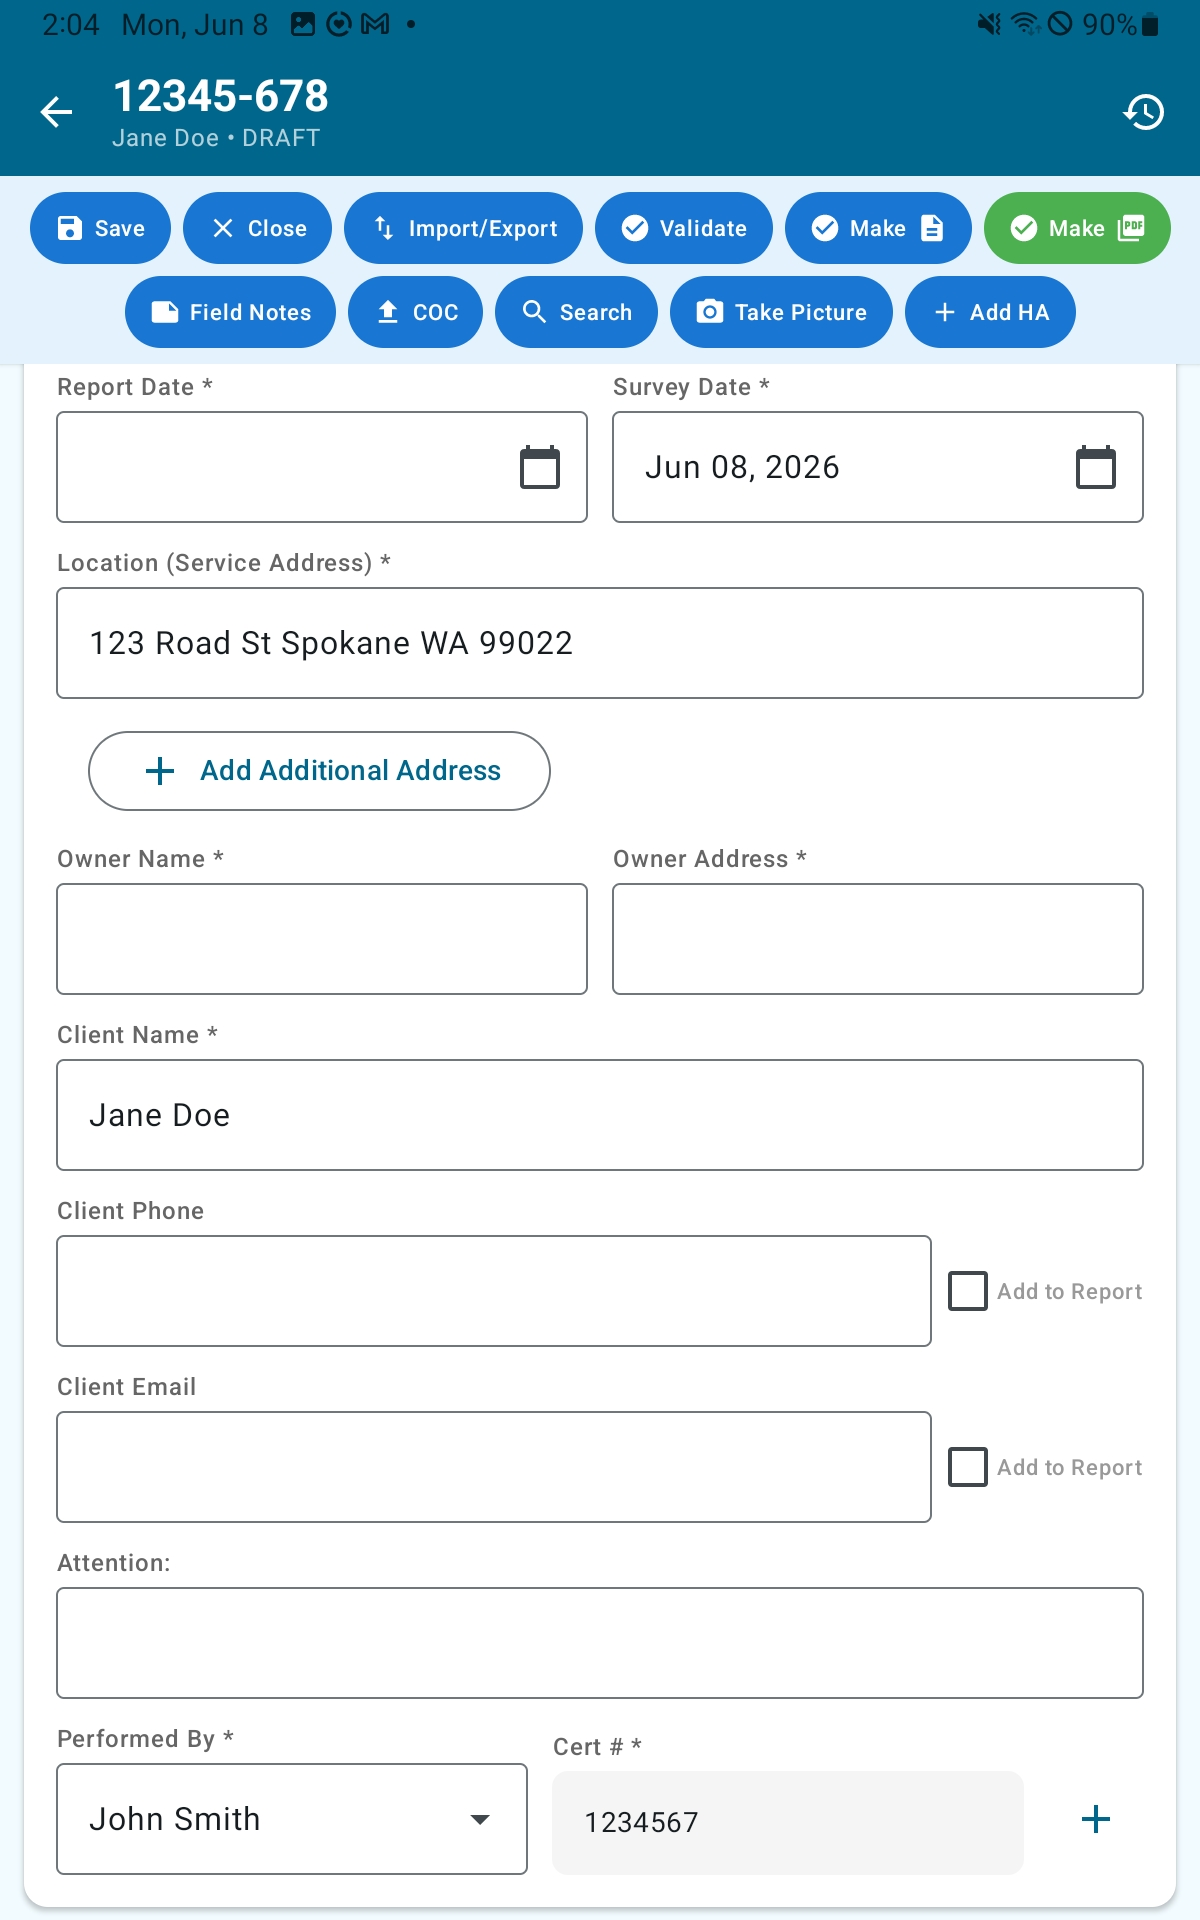
Fields
- Report Date — the date the report is issued. Defaults per your Default Report Date setting (Today’s Date, Survey Date, or Ask Each Time — configured in Settings).
- Survey Date
- Service Address
- Additional Addresses — use Add / Remove to list multiple addresses when the survey covers more than one location
- Owner Name and Owner Address
- Client Name, Client Phone, Client Contact Name, Client Email
- Include Client Phone in Report / Include Client Email in Report — toggles that control whether those fields appear in the PDF
- Primary Inspector — dropdown selecting from your active inspector profiles. The primary inspector’s signature appears on the cover page.
- Additional Inspectors — add or remove other inspectors who participated in the survey
Background
The Background section contains the narrative portions of the report. Each subsection has a Change Template button and most have a page break toggle that controls whether that subsection starts a new page in the PDF.
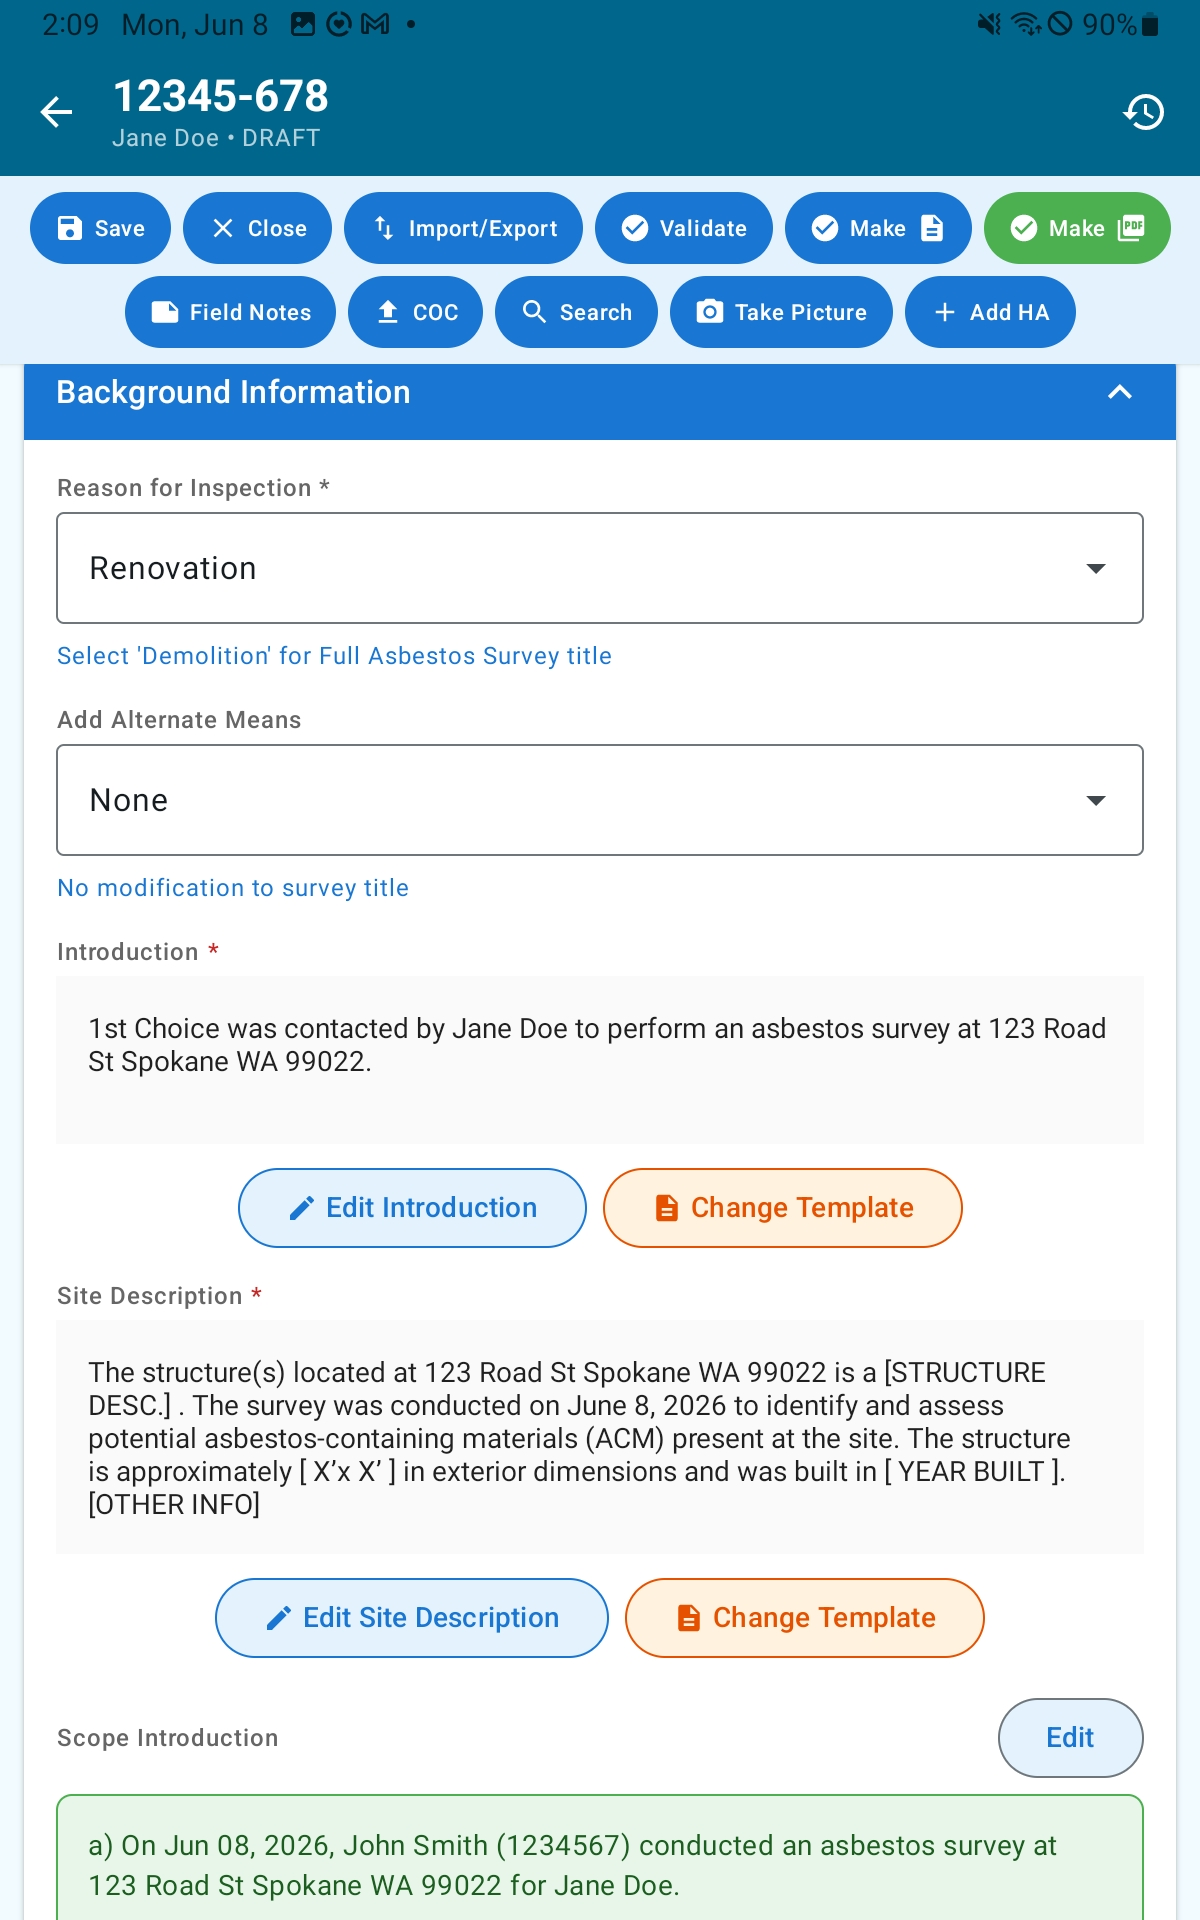
Subsections
- Reason for Inspection — a dropdown that selects the reason for the survey and drives the report title.
- Alternate Survey Option — a dropdown with three choices:
- (empty) — standard report title
- Make Alternate Survey — changes the title to ALTERNATE ASBESTOS SURVEY
- Add Alternate Means — appends “With Alternate Means” to the title and reveals the Alternate Means text subsection below
- Introduction Text — narrative introduction to the report
- Site Description — description of the building and property
- Scope Intro Text — introductory scope paragraph
- Scope Text — what areas and materials were inspected
- Methodology Text — how the inspection and sampling were performed
- Alternate Means Text — only visible when Alternate Survey Option is set to “Add Alternate Means”
- Limitations — standard disclaimers about the scope and limits of the inspection
Loading a Template
Tap Change Template on any subsection to choose from your saved templates for that section type. A confirmation dialog (“Replace existing text?”) appears before the current content is replaced. All template variables — project number, address, dates, inspector name, etc. — are automatically substituted with your survey’s actual data. See Boilerplate Templates for how to create them.
Validate
The Validate button in the action ribbon checks the following subsections are filled: Reason for Inspection, Introduction Text, Site Description, Scope Text, Methodology Text, and Limitations. If any are missing, the error message lists exactly which fields need attention.
Summary
The Summary section has two parts: auto-calculated findings and your written recommendations.
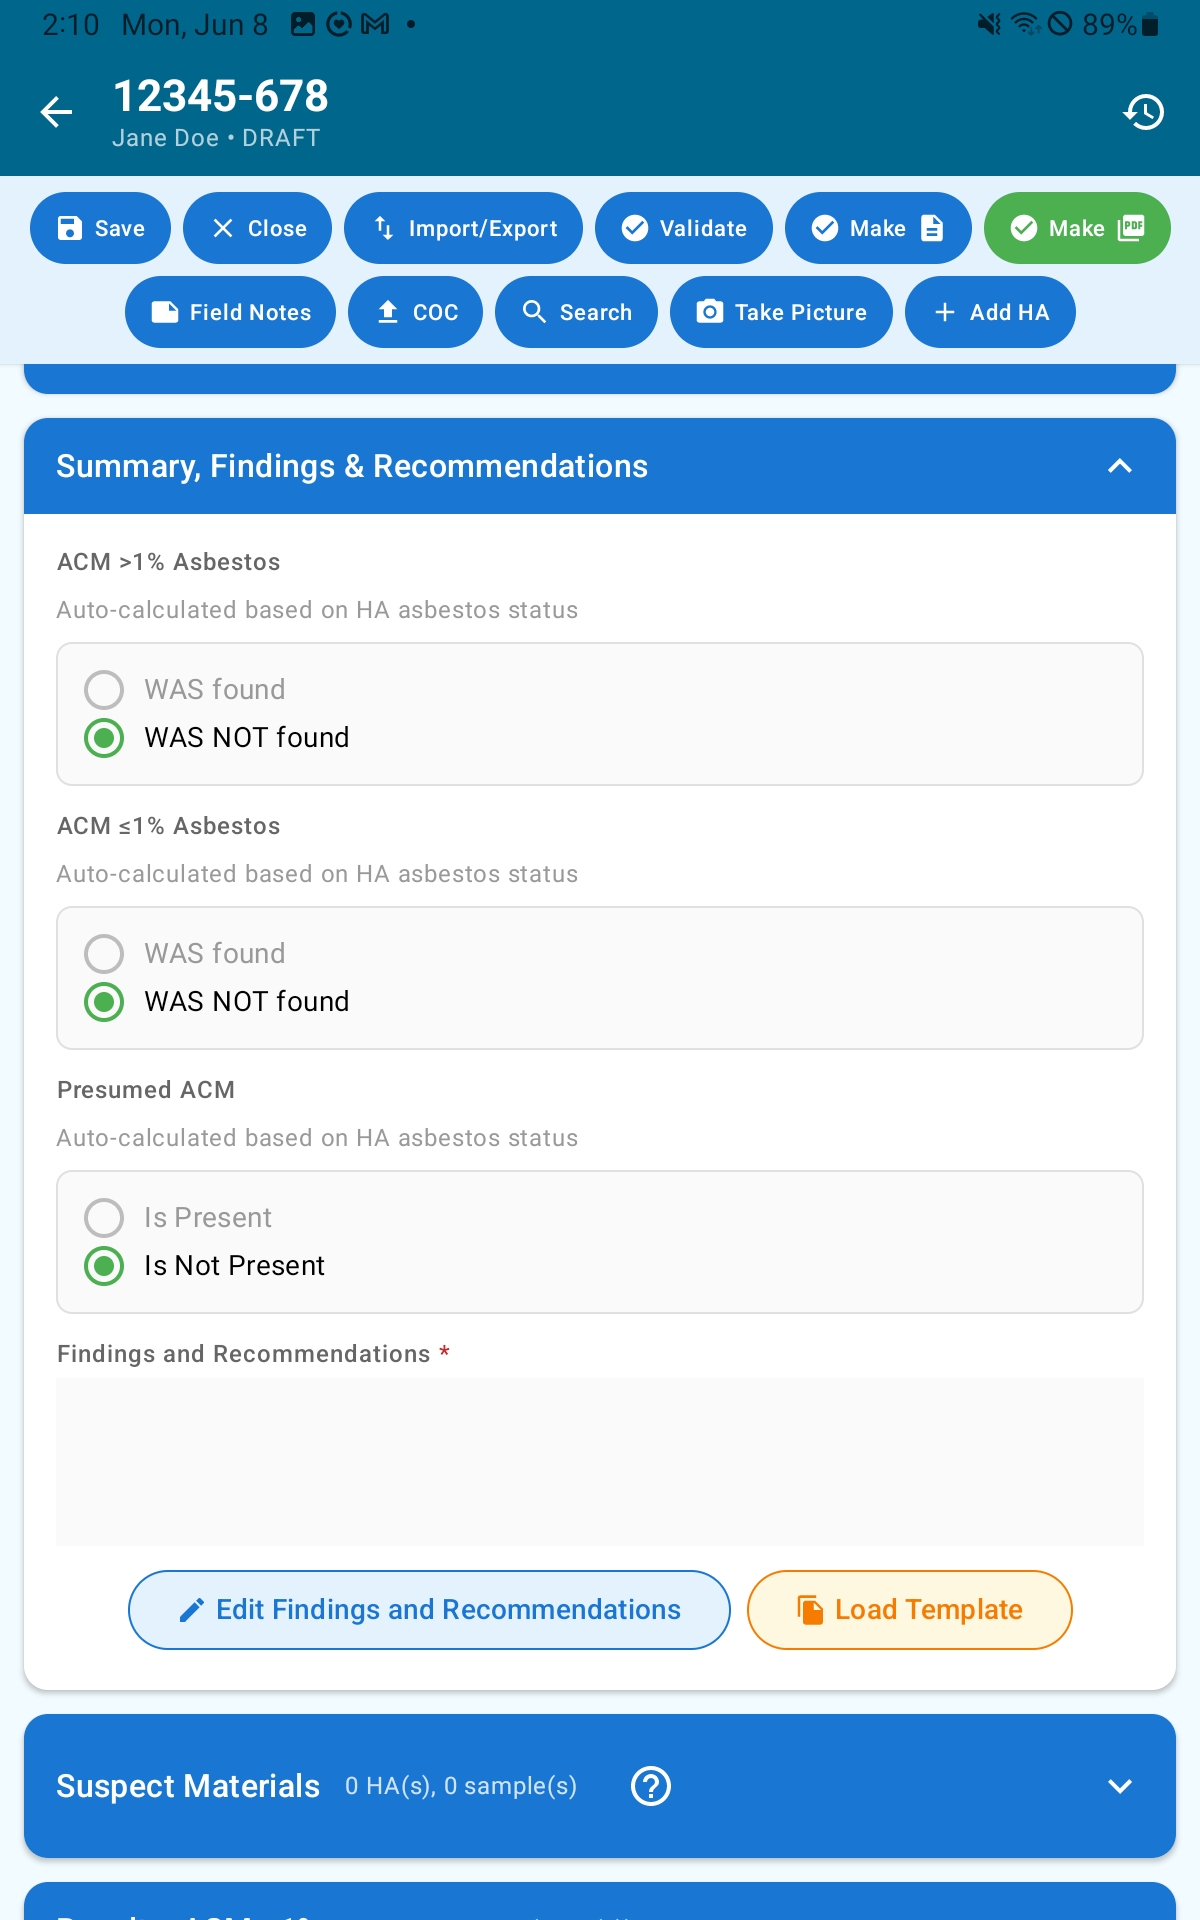
Auto-Calculated Findings
These three rows are read-only and update automatically as you work:
- ACM >1% Asbestos — shows WAS found (red) if any HA has a status of YES; otherwise WAS NOT found (green)
- ACM ≤1% Asbestos — driven by HAs marked ≤1%
- Presumed ACM — driven by HAs marked Presumed
HAs with Exclude from Report enabled do not count toward these findings.
Recommendations
A rich-text editor for your professional recommendations. Tap Load Template to insert saved Recommendations text. Template variables available for this section: {PROJECT_NUMBER}, {SERVICE_ADDRESS}, and {CLIENT_NAME}.
Homogeneous Areas (Suspect Materials)
A Homogeneous Area (HA) is a discrete region of suspect asbestos-containing material that is uniform in appearance, composition, and condition. Every suspect material found at the site should be recorded as its own HA. The Suspect Materials section is where you build this list.
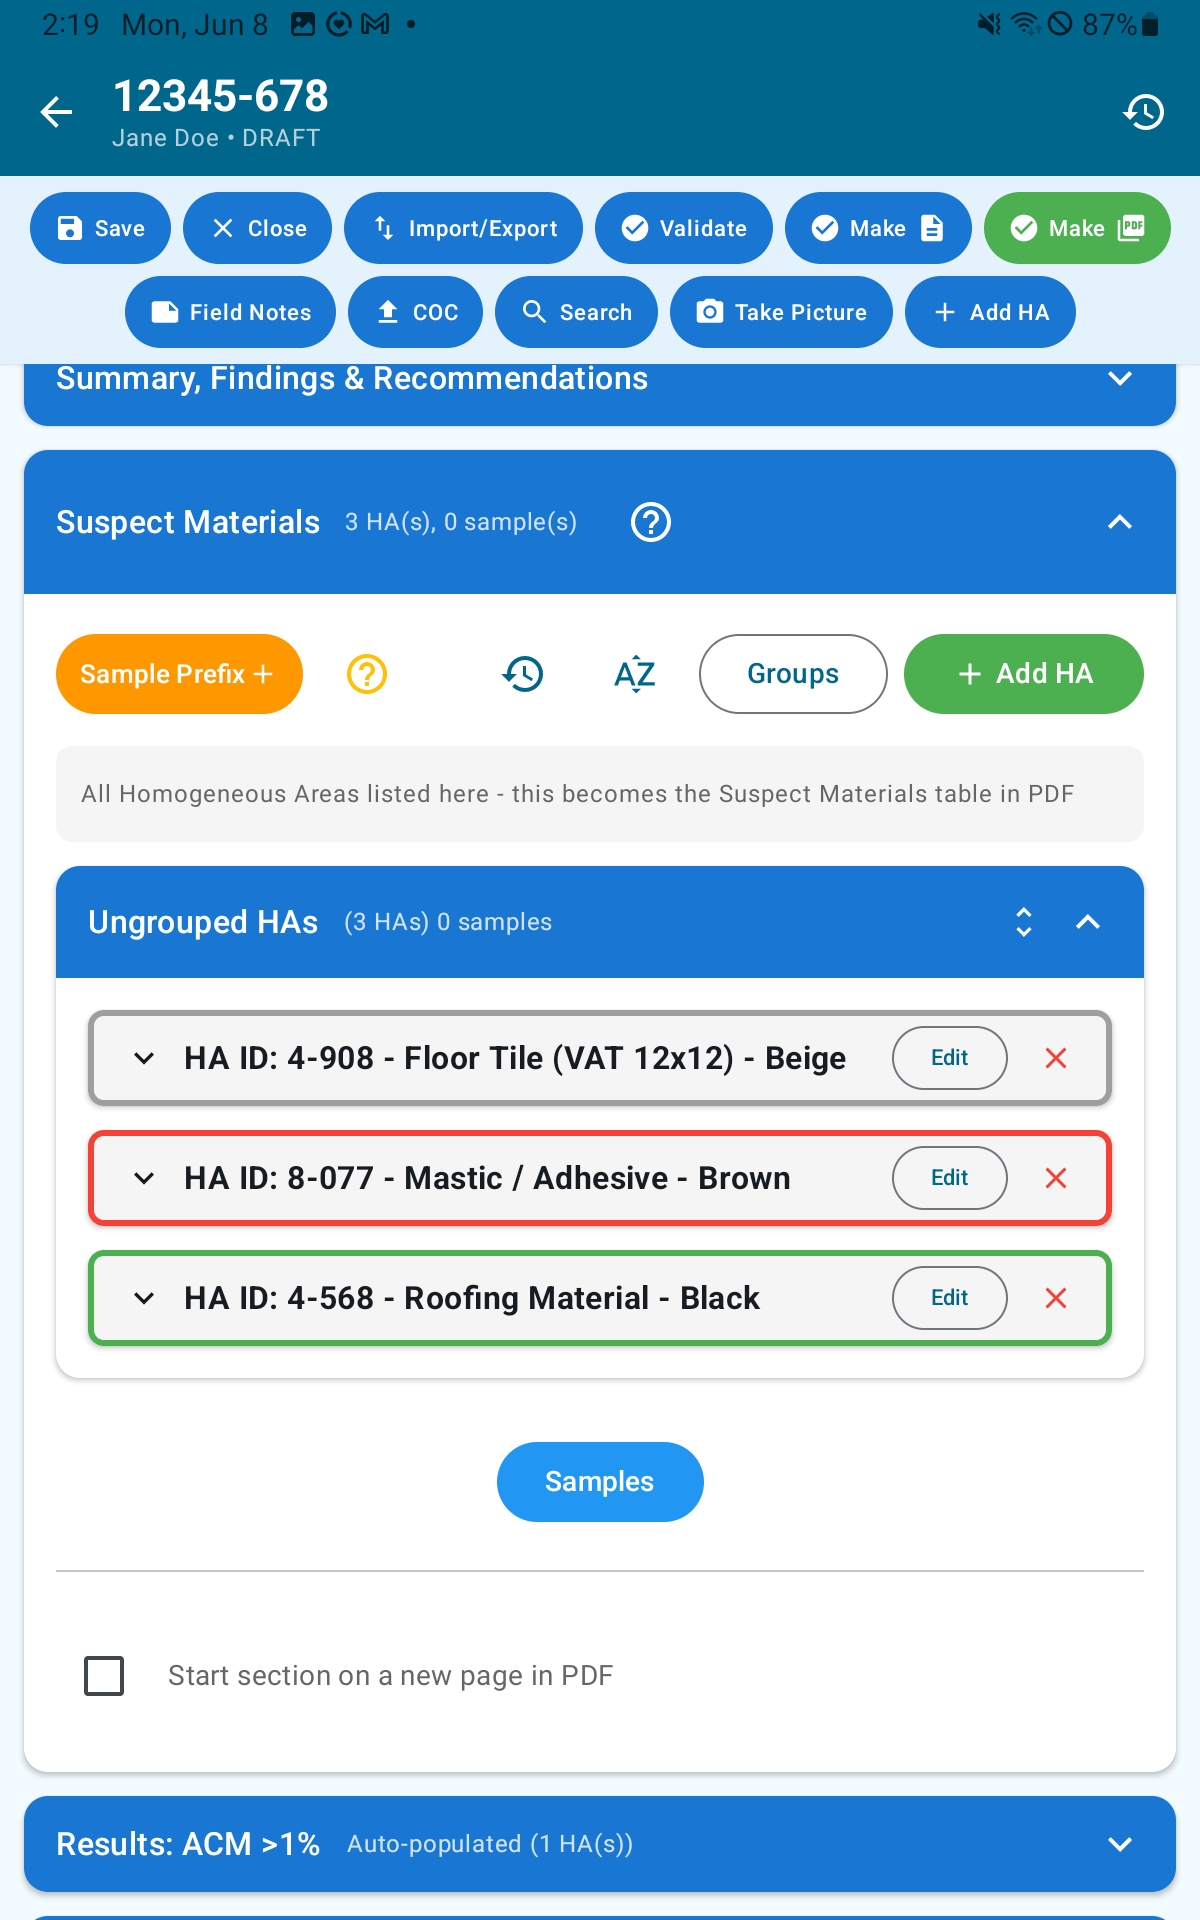
Section Header Controls
- Sample Prefix selector (orange button) — shows the active prefix. Tap to switch between prefixes or choose “Add New Prefix…” to create one. The active prefix auto-fills when you add a new sample.
- ? — opens an explainer about the sample prefix system
- History (clock icon) — opens Restore Points history to roll back the survey to a prior snapshot
- Sort — sort HAs by HA ID (ascending or descending) or by Asbestos Status
- Manage Groups — create and manage named groups (e.g., “First Floor,” “Boiler Room”) to organize HAs
- Add HA (green button) — opens the HA dialog to create a new Homogeneous Area
HA Cards
Each card shows the HA ID, material description, asbestos status badge, material color swatch, quantity, condition, and counts of samples and photos. The card border is color-coded by status. Tap the expand chevron to reveal the sample list and per-HA actions: Edit HA, Delete HA, Add Photo, Add Sample.
HAs are grouped by their assigned group. HAs with no group appear under “Ungrouped.” Groups can be collapsed or expanded.
Asbestos Status Badges
New HAs default to Awaiting Results. A gray badge indicates Not Tested.
Adding a Homogeneous Area
Tap Add HA (in the section header or action ribbon). The HA dialog contains all fields on a single screen:
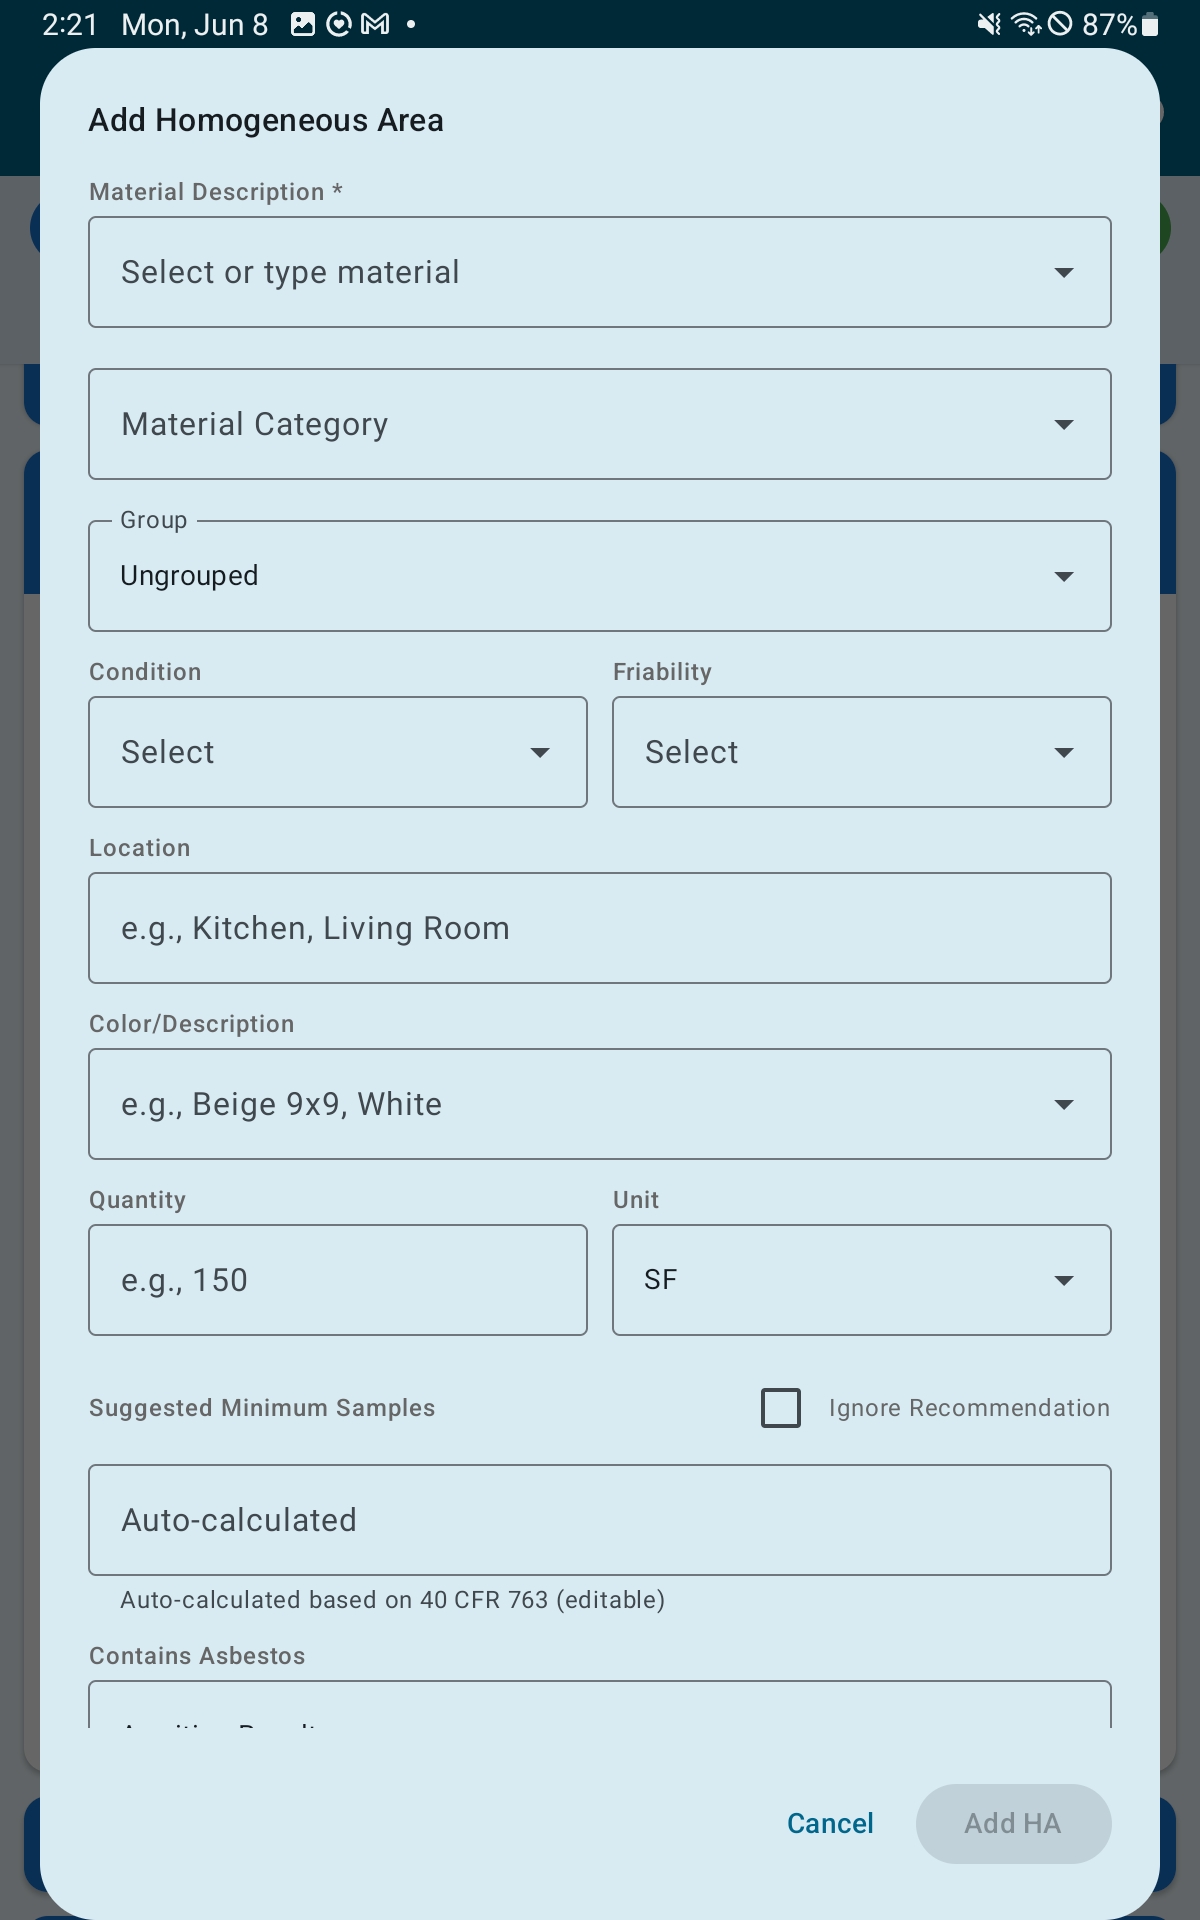
- Material Description (required) — autocomplete field with common material suggestions. Be specific: e.g., “9×9 beige vinyl floor tile” rather than “tile.”
- Material Category (required) — select one:
- Thermal System Insulation (TSI) — pipe wrap, boiler insulation, duct insulation, tank insulation, elbows, fittings, patches
- Surfacing Material — spray-applied fireproofing, trowel-applied coatings, acoustic plaster
- Miscellaneous — floor tile, caulking, joint compound, window glazing, mastic/adhesive, roofing felt, gaskets
- HA Group — optionally assign to a named group
- Material Condition — Good, Fair, Poor, Damaged, Significantly Damaged, or Fire Damaged
- Friable / Non-Friable toggle
- Location — include room name and a specific reference point (e.g., “Kitchen, north wall, floor”)
- Material Color
- Quantity Value and Quantity Unit — units include SF, SY, LF, CF, Each, and others; custom units can be added from Settings → Manage Units
- Min Samples Required — auto-calculated per AHERA rules (see below). Display only; override with Ignore Sample Recommendation.
- Contains Asbestos (required) — dropdown: Not Tested, Awaiting Results, YES, NO, ≤1%, Presumed. Defaults to Awaiting Results on new HAs.
- Asbestos Content % — required when Contains Asbestos is YES or ≤1%
- Qualitative Result toggle — marks the result as contains asbestos yes/no
- Notes — optional. Enable Show Notes in Table to include notes in the PDF suspect materials table.
- Remove From Suspect Materials — removes this HA from the PDF and from the Summary auto-counts without deleting it from the app
Tap Add HA to add the Homogeneous Area. In edit mode a Delete button is also present — deleting an HA permanently removes it and all its samples.
AHERA Minimum Sample Recommendations
The app calculates the minimum samples recommended per AHERA (40 CFR 763) based on category and quantity:
- Miscellaneous: 2 samples (fixed regardless of quantity)
- TSI and Surfacing — by area in square feet:
- Less than 1,000 SF → 3 samples
- 1,000 to 5,000 SF → 5 samples
- More than 5,000 SF → 7 samples
Enable Ignore Sample Recommendation to suppress the recommendation for any individual HA.
Adding a Sample
Samples must be associated with an HA and are created from within an individual HA card. Expand an HA card and tap Add Sample. The sample dialog is a two-page form — tap Next to advance and Back to return.
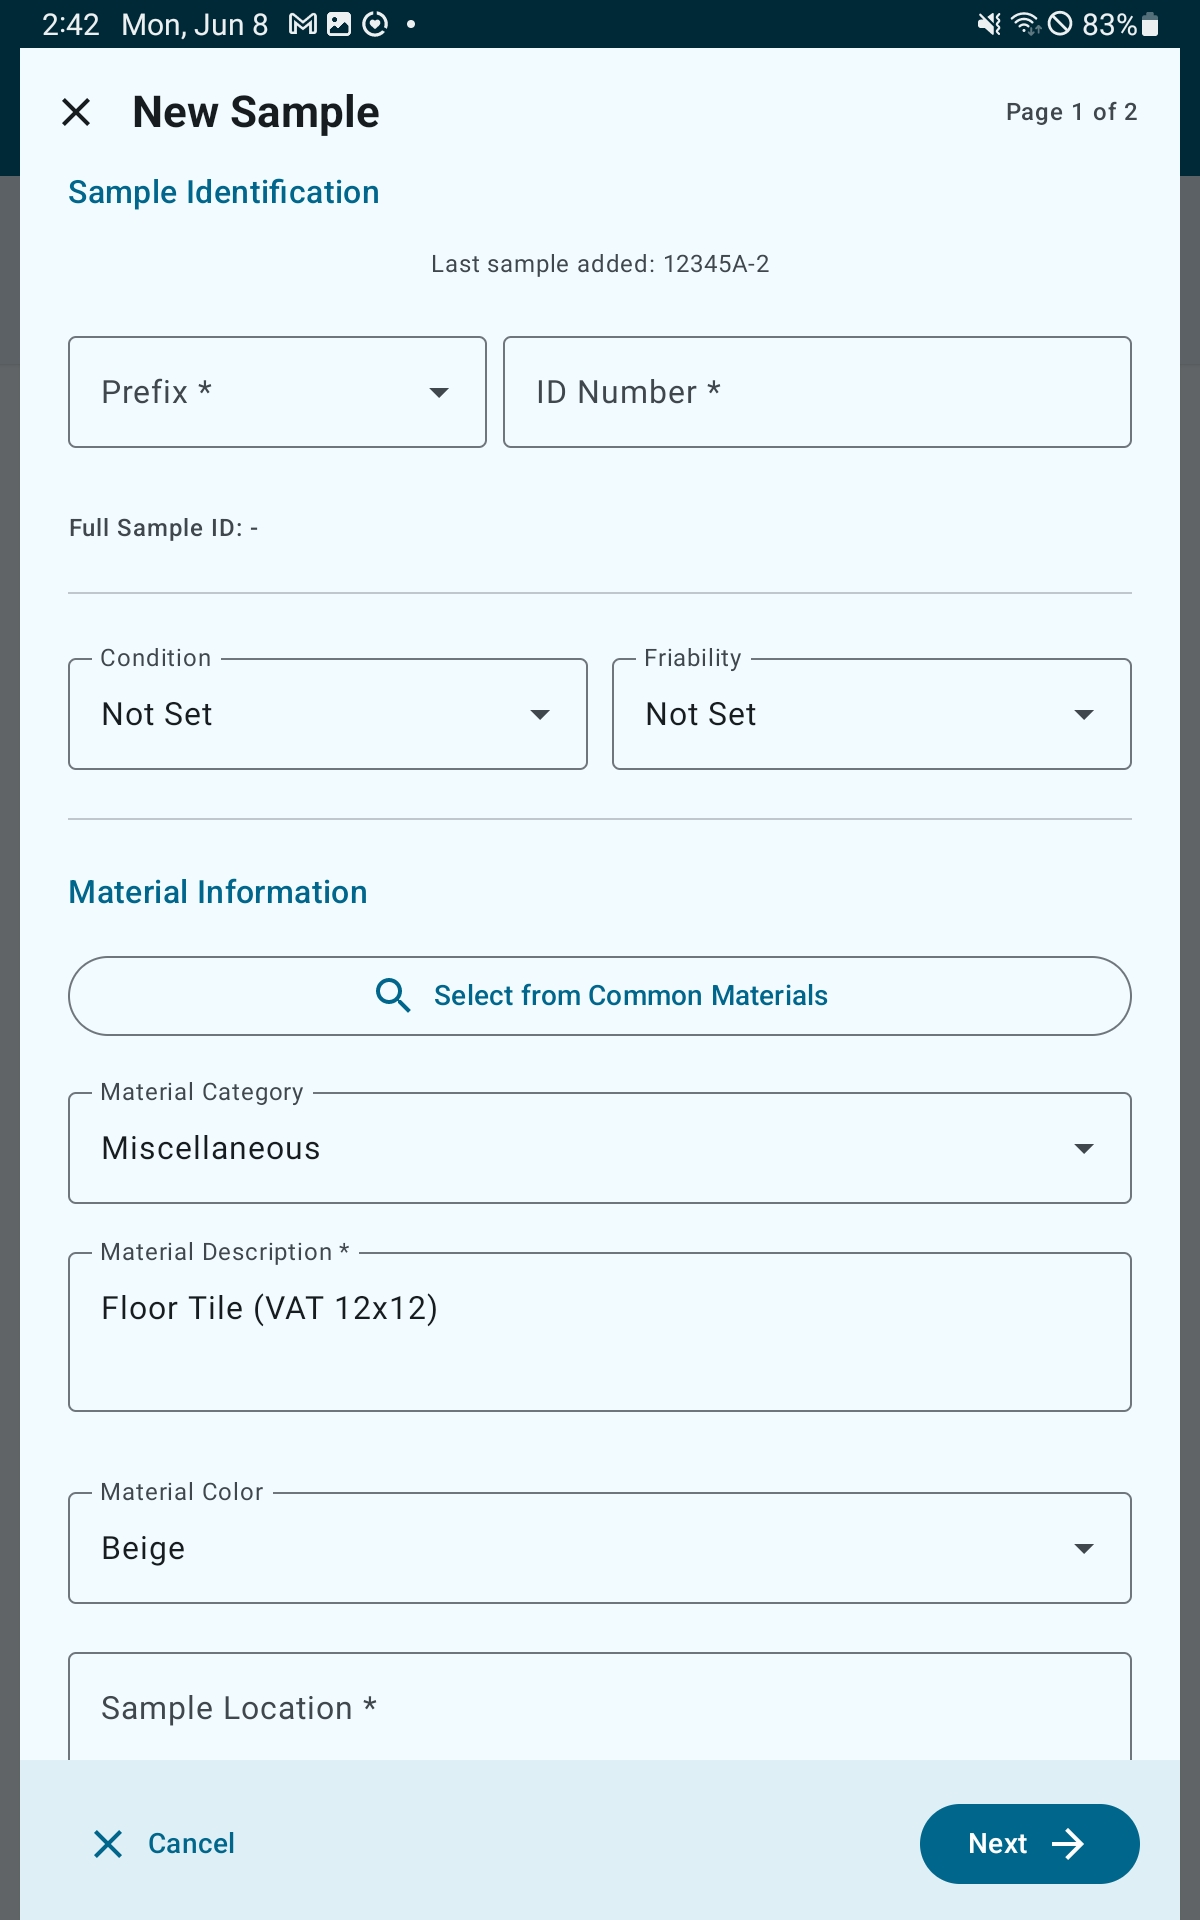
Page 1 — Sample Identification & Material Information:
- Prefix (required) — select from your active prefixes
- ID Number (required) — auto-increments per prefix; can be edited manually. The full Sample ID combines prefix and number.
- Condition and Friability dropdowns
- Select from Common Materials — opens a list of common materials. Selecting one fills in the Category, Description, and Color.
- Material Category, Material Description (required), Material Color
- Sample Location (required)
Page 2:
- Show in Table toggle — controls whether this sample appears in the PDF results table
- Notes
- Add Photo — attach a photo to this specific sample
Lab Reports
The Lab Reports section lets you attach the PDF lab report from your laboratory. You can attach one or multiple lab reports — each report you add will appear in the Lab Reports section of the generated PDF.
Photos
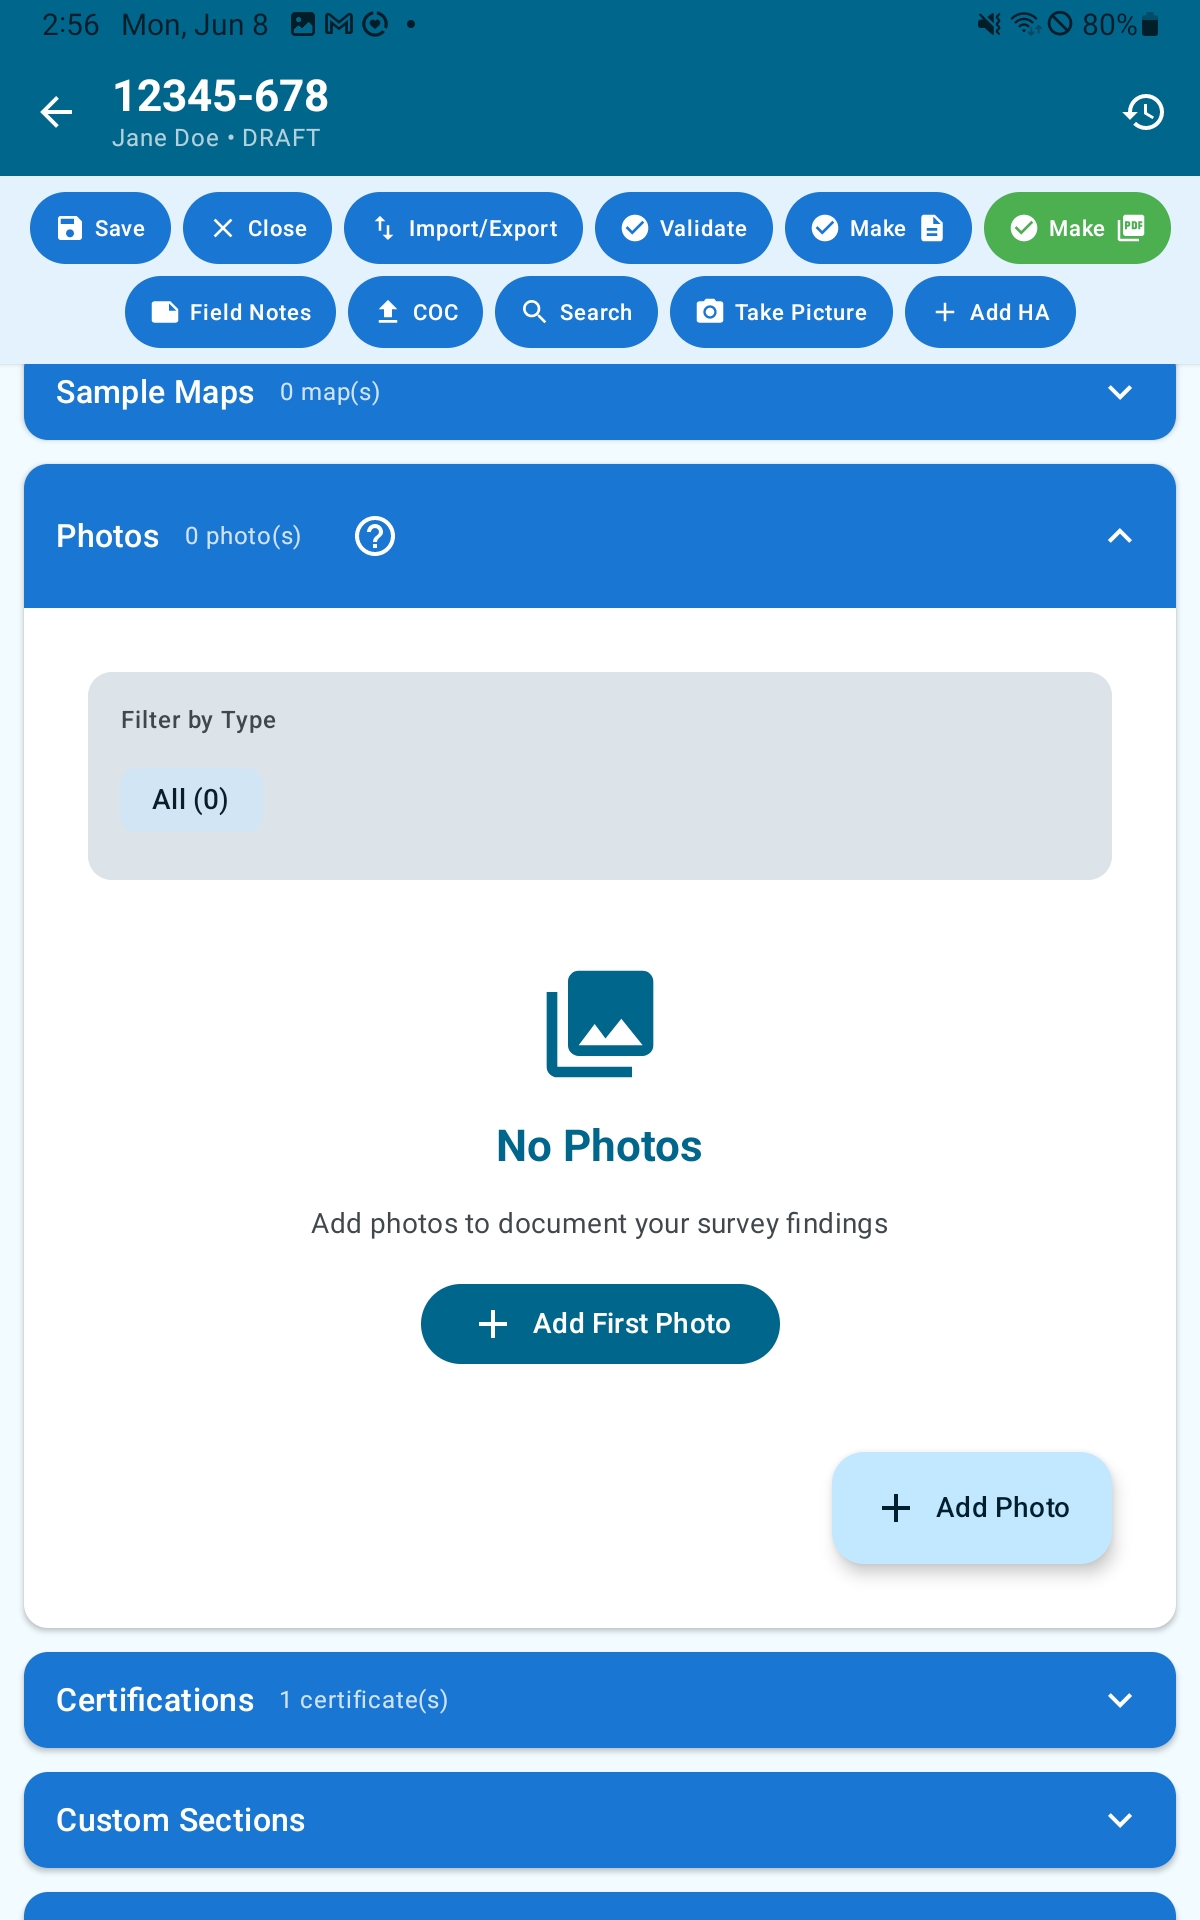
Photo Types
- Site — general building and property photos; appear in the Photographic Documentation section of the PDF
- HA — photos of the homogeneous area showing where the material is located; appear in Photographic Documentation
- Sample — close-ups of sampled materials; appear in Photographic Documentation
Adding Photos
- Tap the + button in the Photos section, or tap Take Picture in the action ribbon
- Choose Camera to take a new photo or Gallery to select from your device
Photos are automatically compressed to a target size of 500 KB. You can adjust the compression quality in Settings → Photo Compression Quality.
Photo Details
Tap any photo to open the detail view. Editable fields:
- Location — where the photo was taken; appears as a caption in the PDF
- Description — what the photo shows; appears as a caption in the PDF
- Include in Photolog toggle — uncheck to exclude a photo from the PDF without deleting it
- Rotation — 0°, 90°, 180°, or 270°
Tap Delete in the detail view to permanently remove the photo.
Bulk Actions
Include All and Exclude All buttons appear when at least one photo exists, letting you toggle all photos at once.
Sample Maps
The Sample Maps section is dedicated to floor plans, site diagrams, and grid layouts that show where samples were collected. Map images appear in their own section in the PDF (separate from the general photo log).
Adding a Map
- In the Sample Maps section, tap Add Photo
- Select a PNG or JPG image from your device (exported from mapping or CAD software, or a photo of a hand-drawn sketch)
- Add a description (e.g., “First Floor Plan — HA Locations”) — this becomes the caption in the PDF
- Tap Save
Maps can be reordered and each has an Include toggle to control whether it appears in the PDF.
Tip: Annotate your map with HA IDs before importing so the map is self-explanatory in the final report. Reviewers can then match the visual map directly to the HA results table.
Custom Sections
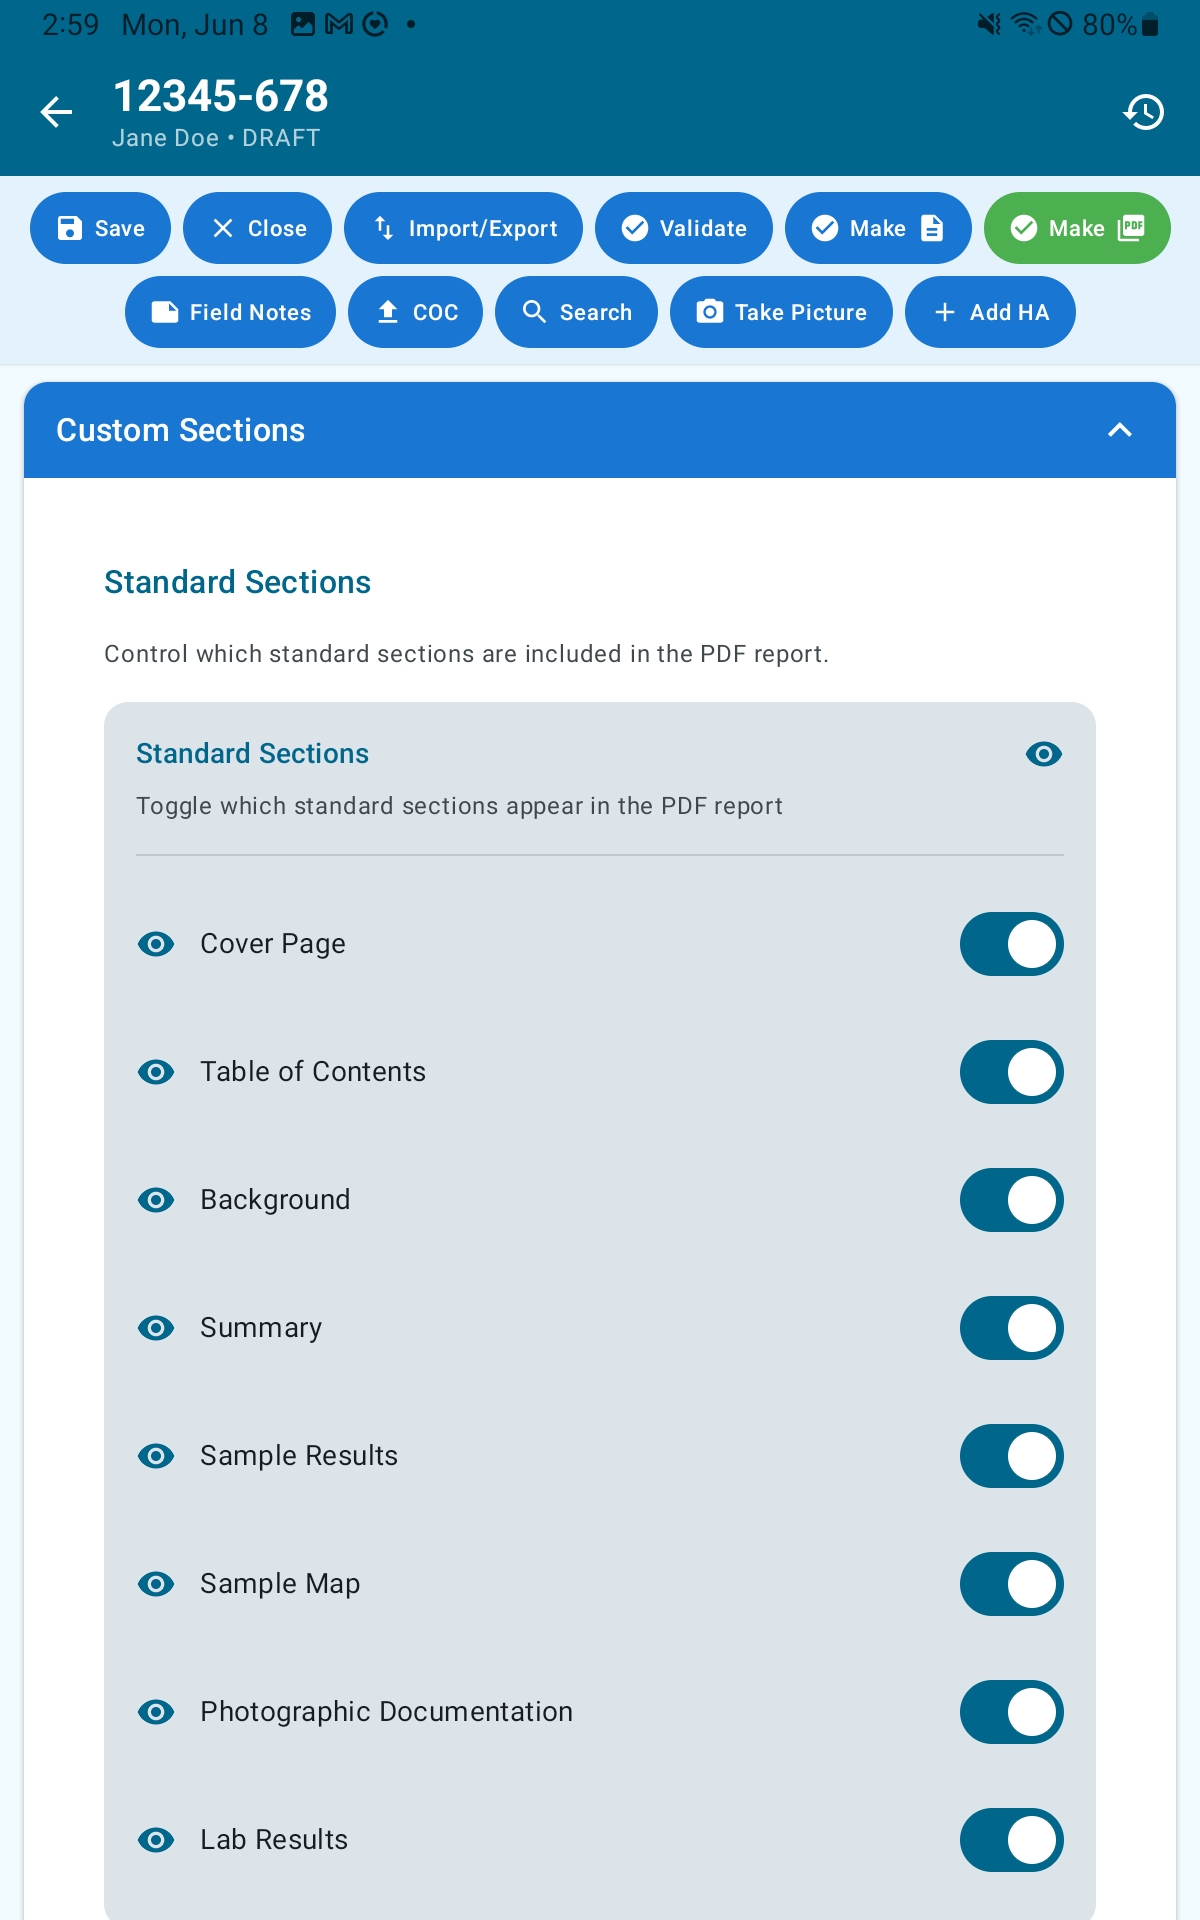
Standard Section Visibility
Toggle switches control which standard sections appear in the generated PDF. Turning a section off hides it from the PDF only — it remains in the editor. The Table of Contents cannot be hidden.
Adding a Custom Section
- Tap Add Custom Section
- Enter a Title (the section heading in the PDF)
- Enter the section Content
- Use Insert After to choose which standard section this follows in the report
- Optionally attach an Image (with its own description text) and/or a PDF Attachment
- Tap Save
To change where a custom section appears in the report, edit it and update the Insert After selection. Custom sections can be edited or deleted from their card.
General PDF Attachments
A separate Attachments area lets you attach loose PDF files that are merged at the end of the report as “Attachment A,” “Attachment B,” etc. Each attachment has an Include-in-Report toggle and a Delete action.
Field Notes
Field notes are a private workspace attached to the survey. They are never included in any PDF report under any circumstances. The section header displays a lock icon and the notice: “Private Notes — Field notes are private and will never appear in the PDF report.”
Use field notes for:
- Weather conditions and site access details
- Client conversation notes
- Internal observations and sampling decision notes
- Follow-up reminders
- Anything you need to keep on record but not include in client deliverables
The Field Notes button in the action ribbon (Row 2) is a shortcut that lets you add notes quickly without scrolling to this section.
Note: Field notes are stored on the device and are included in backups. They are private only in the sense that they are excluded from the PDF — they are not encrypted or otherwise protected from anyone with access to the device or backup file.
Part 4 — Chain of Custody (COC)
What Is a Chain of Custody?
A Chain of Custody (COC) is a required document submitted with bulk samples to the laboratory. It records the samples being submitted, the analyses requested, the turnaround time, and the transfer of custody from the inspector to the lab. The app generates a COC as a PDF that can be printed or emailed.
The COC includes inspector and company information, sample IDs and descriptions, requested turnaround time and test methods, delivery method, and any remarks you add.
Generating a COC
Open the COC dialog from the CoC button in the action ribbon (Row 2).
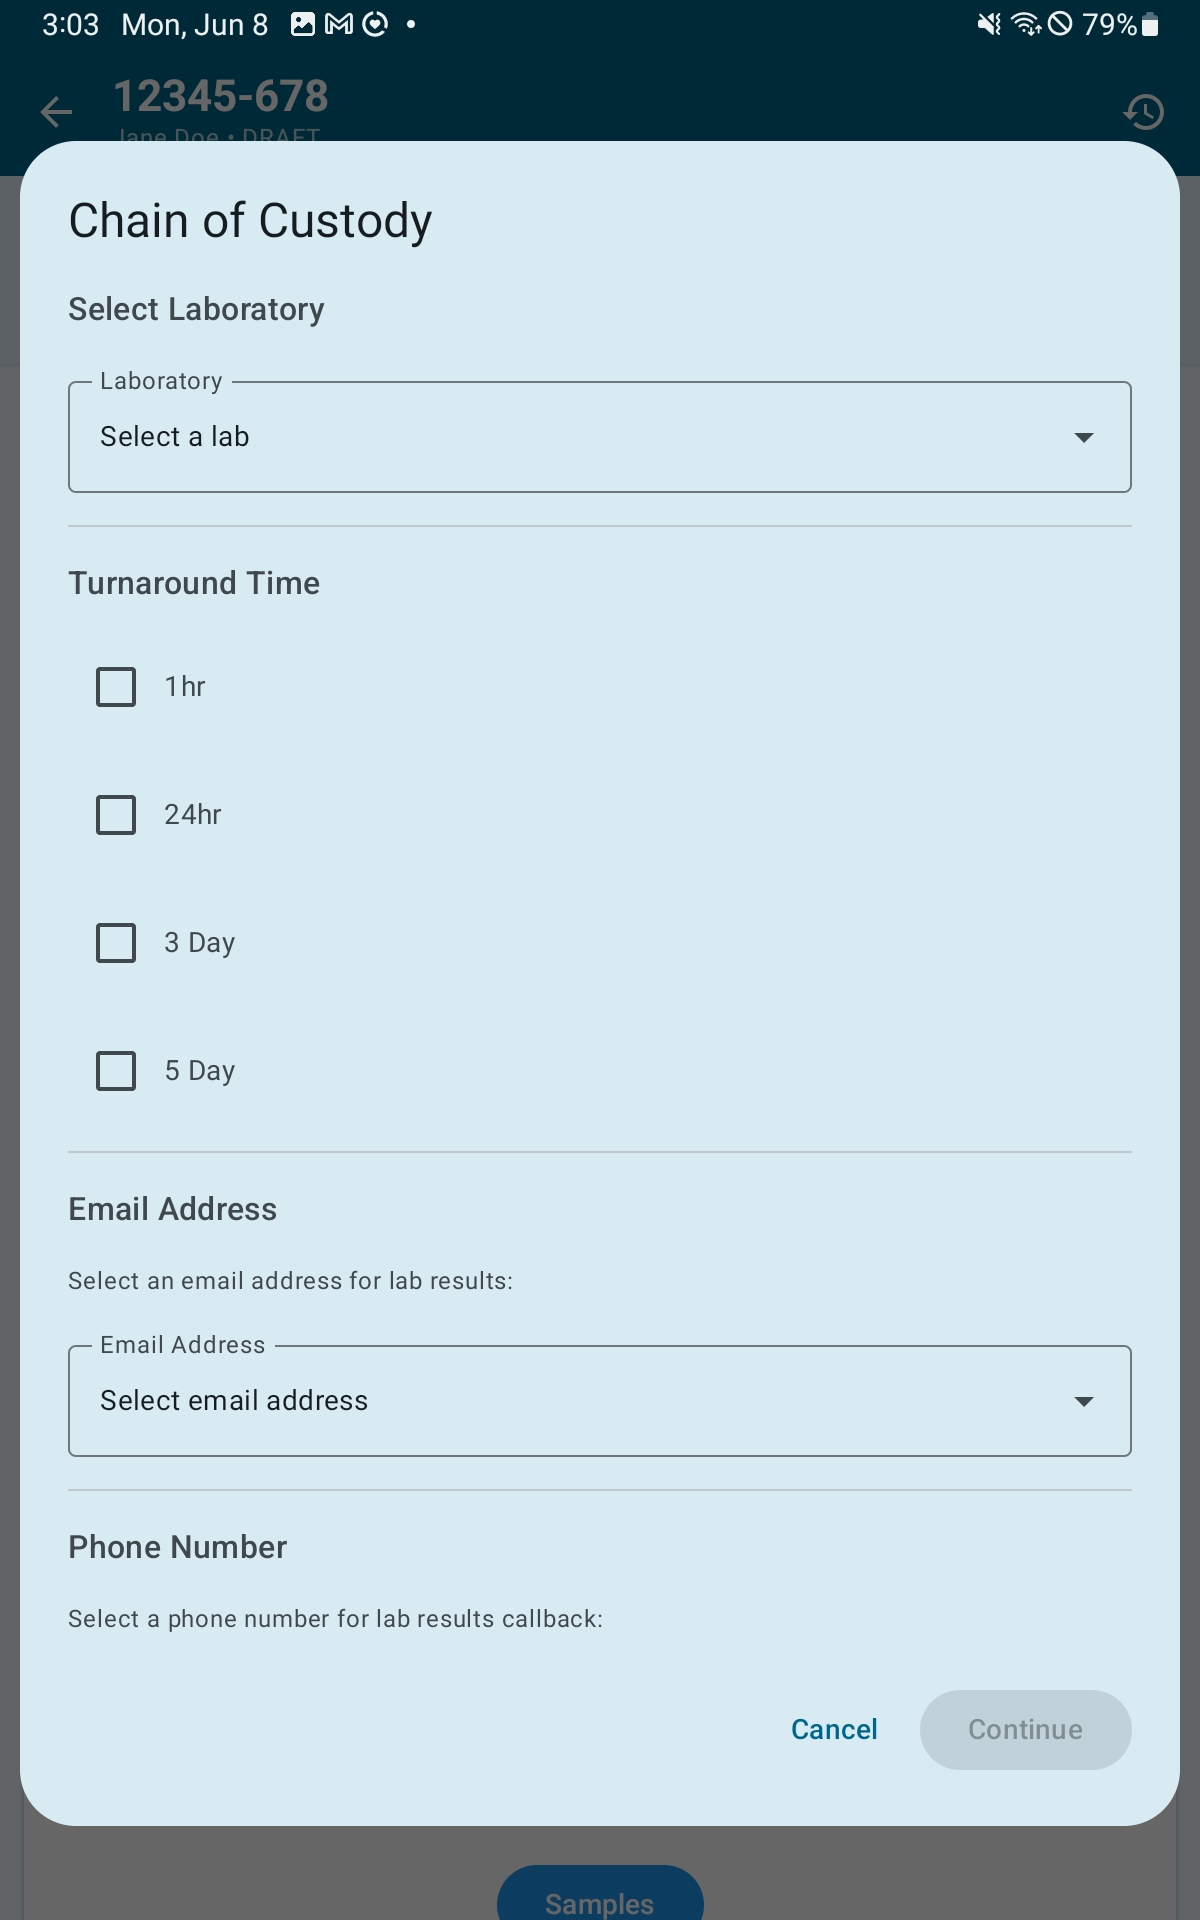
- Select the Laboratory from the dropdown
- Select a Turnaround Time: 1hr, 24hr, 3 Day, 5 Day, or Other
- Select your company Email Address, Phone Number, and Mailing Address from the dropdowns for lab results contact
- Optionally check Attach Signature
- Choose a Delivery Method
- In the sample list, select or deselect samples and check PLM and/or TEM for each
- Optionally add Remarks
- Tap Continue to generate the COC PDF
Part 5 — Inspectors & Lab Management
Inspector Profiles
Inspector profiles store certification information and are linked to surveys. Go to Settings → Manage Inspectors to manage them.
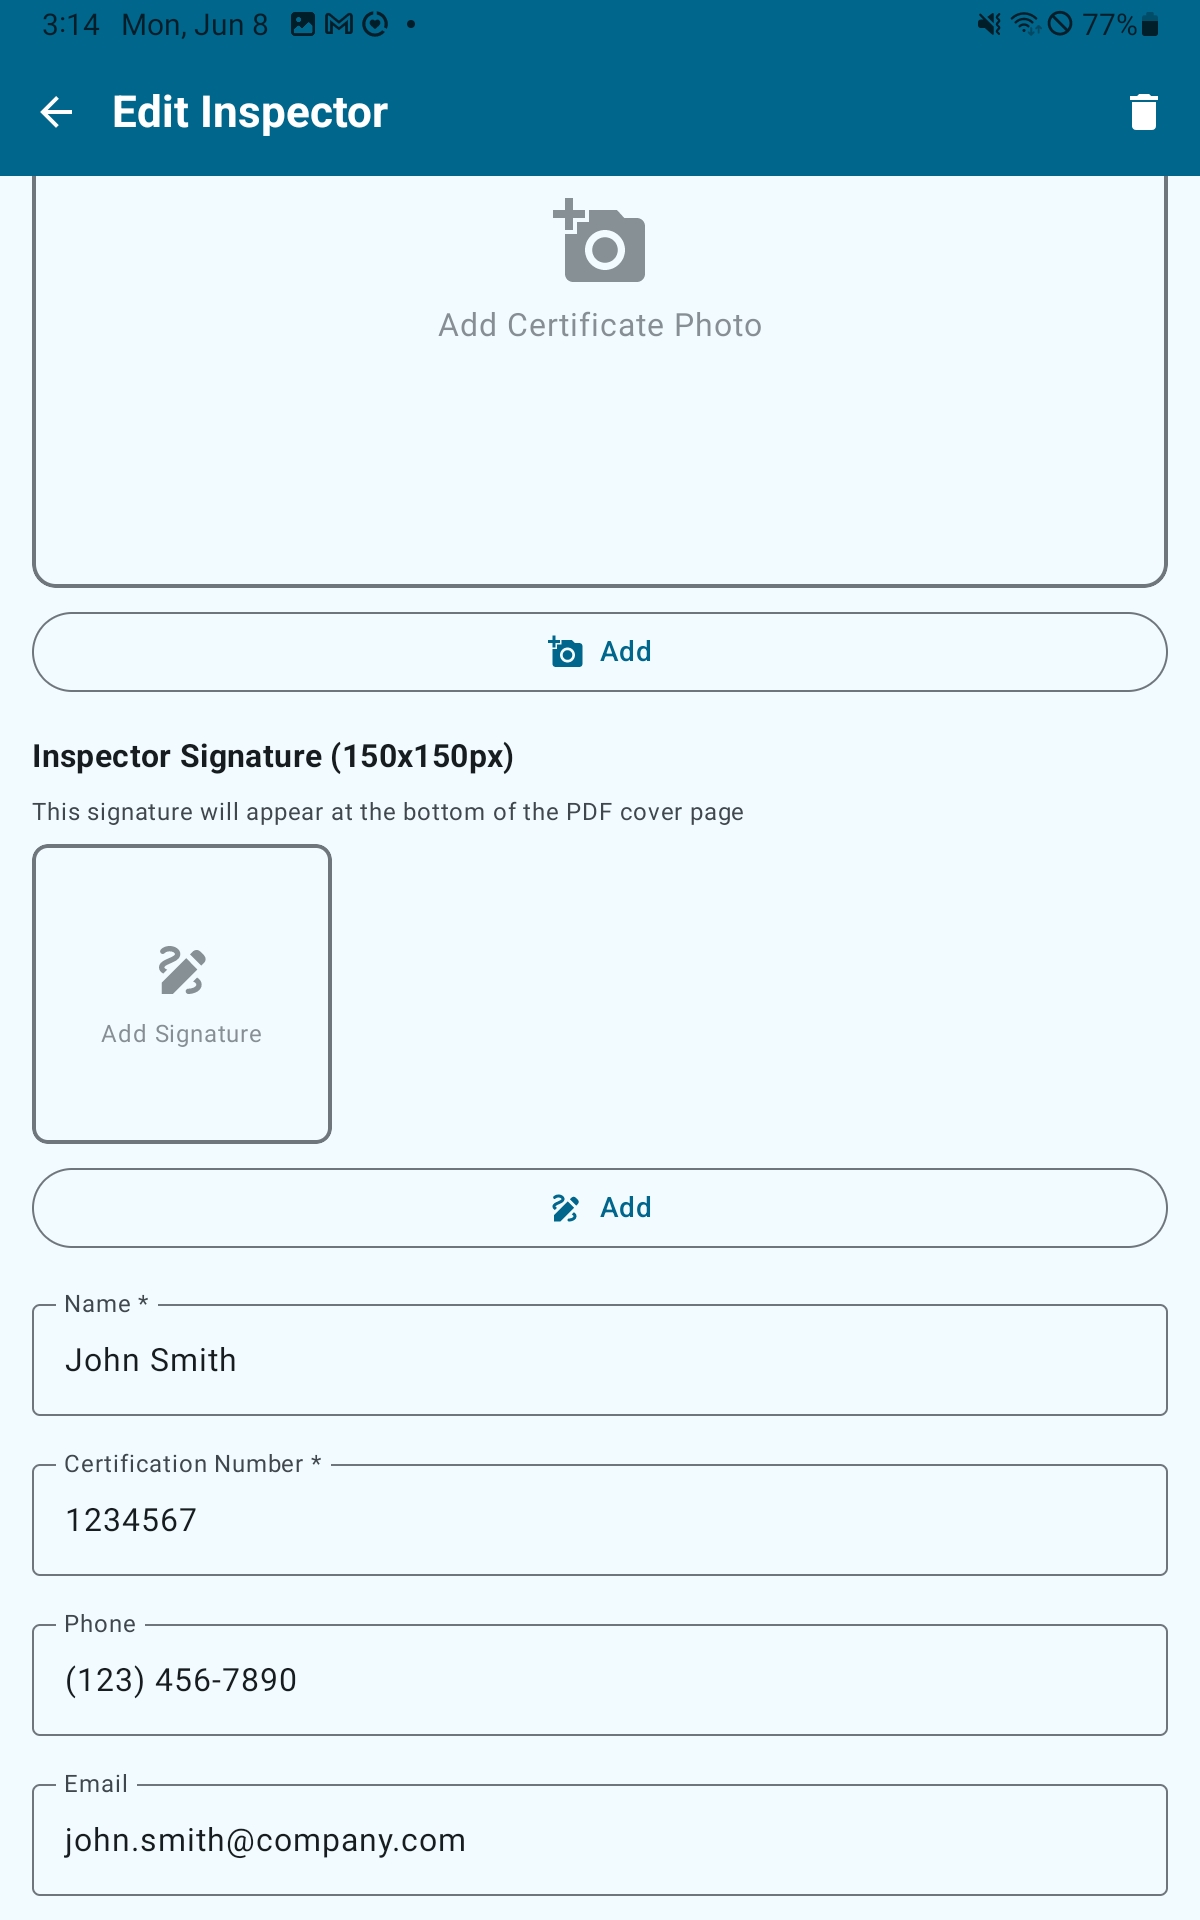
Adding an Inspector
- Go to Settings → Manage Inspectors
- Tap the + button
- Enter the inspector’s Name (required) and Certification Number (required)
- Optionally add Phone, Email, and Certificate Expiry Date
- Optionally add a Certificate Photo (the accreditation certificate image, 16:9 aspect ratio) and an Inspector Signature image (150×150 px — appears on the PDF cover page)
- Tap Save Inspector
Inspectors can be deactivated without being deleted via the overflow menu on their card. The visibility toggle in the top bar shows or hides inactive inspectors in the list.
Default Inspector
In Settings, use the Default Inspector dropdown to set which inspector is automatically linked to every new survey. You can override this on any individual survey from the Cover Page section.
Inspector Certificate Images
The accreditation certificate document image for each inspector is managed under Settings → Manage Certificates → Inspector Certificates (first tab). From there you can add, replace, or remove the certificate image and set or edit the expiry date.
Note: Certificate photos must be an image file (PNG, JPEG, or GIF). Signature images should use a plain white background — images with a transparent background may appear black in the report.
Lab Certificates
Lab certificate records store your laboratory’s NVLAP accreditation information. This data pre-populates COC forms. Lab certificate images appear in the Certifications section of the PDF report.
Go to Settings → Manage Certificates → Lab Certificates (second tab).
Adding a Lab Certificate
- Tap Add Certificate
- Select the certificate image from your device
- In the info dialog, enter: Certificate Label (e.g., “EMSL Analytics”), Lab Name (required), Lab Address, NVLAP Number, and Lab Phone Number
- Tap Save
The certificate marked as Default (star badge) is pre-selected when generating a COC. Tap Set Default on any certificate to make it the default. Use Edit Info to update lab details or Change Image to replace the certificate document image.
Note: Certificate photos must be an image file (PNG, JPEG, or GIF).
Multiple Inspectors Per Survey
For team inspections, all participating inspectors can be added to a single survey from the Cover Page section:
- Ensure all inspectors have profiles set up in Settings → Manage Inspectors
- Open the survey editor and expand the Cover Page section
- The Primary Inspector dropdown selects the lead inspector whose signature appears on the cover page
- Use the Additional Inspectors controls to add other participating inspectors
For coordinating field work across multiple devices, see Survey Import & Export.
Part 6 — Templates
Boilerplate Templates
Templates save standard text for Background and Summary subsections so you do not have to rewrite them for every survey. Templates support variables that are automatically replaced with project-specific data when loaded.
Template Types
Each template is tied to a specific section type. The available types are: Introduction, Site Description, Scope of Work, Methodology, Alternate Means, Limitations, and Recommendations.
Creating a Template
- Go to Settings → Manage Templates
- Tap +
- Enter a Template Name (required, max 100 characters)
- Tap the Template Type card and select the section this template belongs to
- Write the template content. Tap the variable chips above the text field to insert tokens at the cursor position.
- Optionally add Notes and toggle Set as Default
- Tap Save
Available Variables
These tokens are replaced automatically with your survey’s actual data when a template is loaded:
{PROJECT_NUMBER}— the project / job number{SERVICE_ADDRESS}— the service / property address{SURVEY_DATE}— date the survey was performed{REPORT_DATE}— date the report is issued{CLIENT_NAME}— name of the client{INSPECTOR_NAME}— name of the inspector{INSPECTOR_CERT}— inspector’s certification number
The Limitations and Recommendations template types support a subset: {PROJECT_NUMBER}, {SERVICE_ADDRESS}, and {CLIENT_NAME}.
Tip: You can create multiple templates per section type — for example, different methodology templates for schools, commercial buildings, and demolition projects. When loading a template you can always browse all templates of that type, regardless of which is set as default.
Setting a Default Template
One template per section type can be marked as the default. It is offered first when you tap Load Template for that section in any survey.
- Go to Settings → Manage Templates
- Open the overflow menu (…) on the template you want to set as default
- Tap Set as Default
The default template is marked with a DEFAULT badge in the list. You can change the default at any time.
Part 7 — Reports
Generating the PDF
- Tap Validate in the action ribbon to confirm all required Background fields are complete (recommended before final generation)
- Tap Make PDF in the action ribbon
- A PDF preview page displays so you can review the report before saving
- Tap Save (bottom right of the preview) to save the PDF locally or to your company drive
Note: PDF file size depends primarily on the number and size of included photos. Large photo counts may slow generation. If a report is too large to email, reduce the number of included photos or lower the Photo Compression Quality in Settings.
PDF Contents & Section Order
A complete report includes the following sections in this order. Sections marked as hideable can be turned off from the Custom Sections area in the editor.
- Cover Page — company logo, project info, client info, primary inspector and signature, additional inspectors. Hideable.
- Table of Contents — auto-generated with page numbers. Cannot be hidden.
- Background — Reason, Introduction, Scope Intro, Site Description, Scope, Methodology, Alternate Means (if applicable), Limitations. Hideable.
- Summary — ACM findings and Recommendations. Hideable.
- Suspect Materials — full HA table. Hideable.
- Results: ACM >1%, Results: ACM ≤1%, Results: Presumed ACM — auto-populated from HA data; skipped if no matching HAs exist.
- Lab Reports — attached lab report PDFs. Hideable.
- Sample Map — floor plans and site diagrams. Hideable.
- Photographic Documentation — Site, HA, and Sample photos grouped by type with captions. Hideable.
- Certifications — inspector and lab certificate images.
- Attachments — custom-section PDFs and general attachments, merged as Attachment A, B, etc.
Custom Sections are inserted at the position specified by their Insert After setting.
What Is Excluded from the PDF
- Standard sections with their visibility toggle turned off
- HAs with Exclude from Report enabled
- Samples with Include in Results unchecked
- Photos with Include in Photolog unchecked
- HA and Sample notes unless Show Notes in Table is enabled for that item
- Field notes — excluded under all circumstances
DOCX Export
Tap Make DOCX in the action ribbon to generate a Microsoft Word version of the report. The DOCX covers the same content as the PDF. When generation is complete, you will have the option to open a preview externally or to save the file.
The DOCX is intended for editing the final report outside the app — for example, to apply firm-specific formatting. Edits made to the DOCX are not synced back into the app.
Part 8 — Data Management
Backup & Restore
All data is stored locally on your device. The app provides a full backup system that captures the entire database — all surveys, HAs, samples, photos, settings, inspector profiles, and company information — in a single ZIP file.
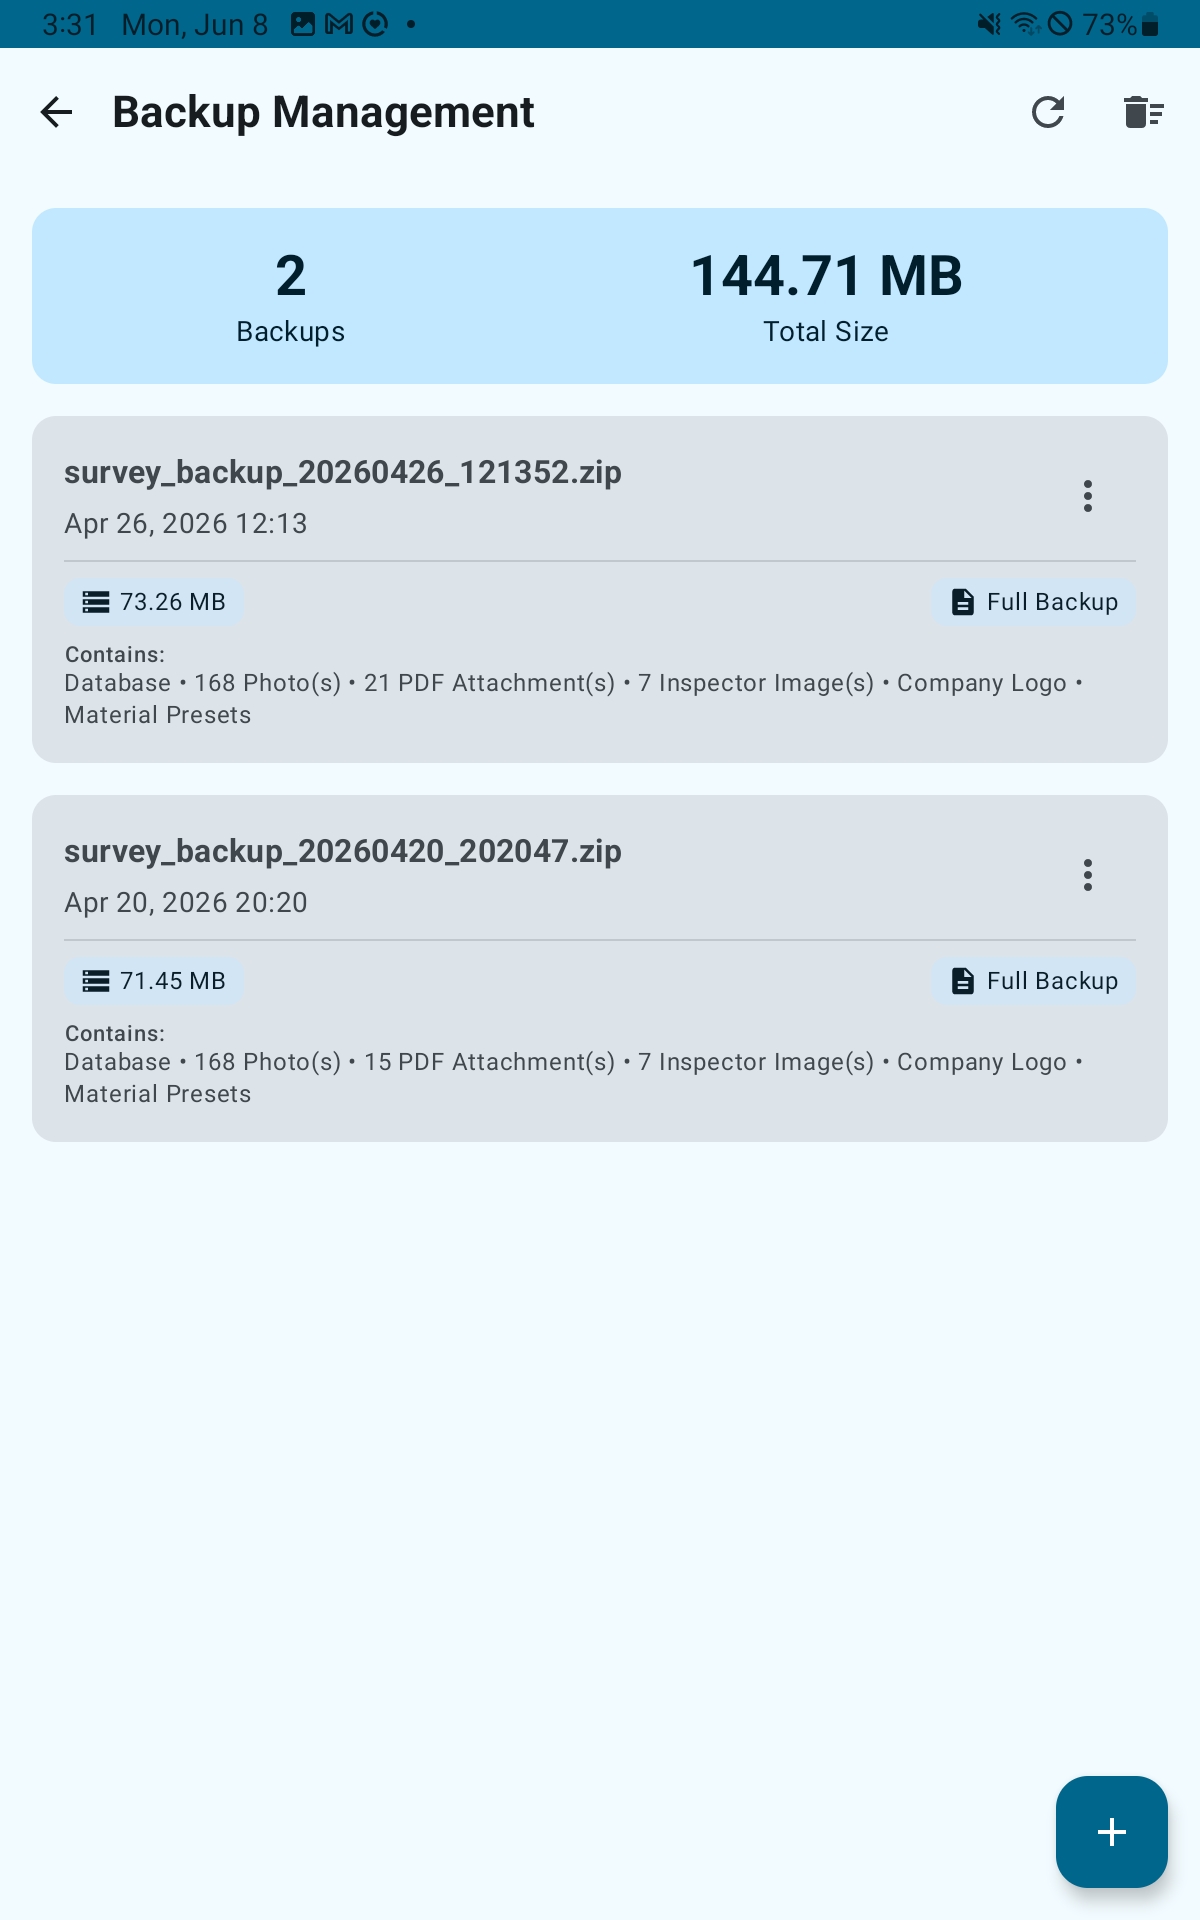
Creating a Backup
- Go to Settings → Manage Backups
- Tap the + button to create a new backup. The file is named
1C_database_backup_YYYYMMDD_HHMMSS.zipand saved in the app’s private storage. - To save the backup somewhere you can access it (Google Drive, email, etc.), open the backup card’s menu and tap Export to Device or Share
Restoring from a Backup
Restoring a backup replaces all data currently on the device. This cannot be undone.
- Go to Settings → Manage Backups
- To restore a backup already in the list, open its menu and tap Import (or tap Restore Backup on the card)
- To restore a backup file from your device storage, tap Import from Device and select the ZIP file
- Read the first confirmation dialog carefully — all current data will be replaced. Tap Continue.
- Tap Restore Now in the second confirmation dialog
Warning: Restore replaces all data on the device with no way to undo. If you have current data you may want to keep, create and export a backup of it before restoring.
Managing Backups
Each backup card shows its size, type, and a summary of contained data. Tap Delete Old Backups and choose a retention window (7, 30, or 90 days) to remove backups older than that window.
Survey Import & Export (Per-Survey)
In addition to full backups, the app supports scoped import and export for individual survey data. This is accessed from within the survey editor: tap Import / Export in the action ribbon (Row 1).
Export Options
- HAs + Samples — exports all Homogeneous Areas, their samples, and the sample-HA links
- Samples Only — samples without HA structure
- Photolog — photos and their captions
Import Strategies
When importing, choose how to handle conflicts with existing data:
- ADD — imports only new items; existing data is untouched
- MERGE — updates matching items in place and adds new ones
- REPLACE — wipes matching subsets and imports fresh; requires an extra confirmation step
The dialog detects and reports conflicts (duplicate IDs, prefix conflicts, data mismatches) before you commit to the import.
Collaborative Survey Workflow
- The primary inspector creates the project and survey and shares the project number with all team members
- Each additional inspector creates a survey on their own device using the same project number. Coordinate sample prefixes beforehand to avoid ID conflicts (e.g., primary uses “A”, second uses “B”).
- All inspectors document their assigned HAs and samples in the field simultaneously
- Each additional inspector exports their data: open the survey → Import / Export → HAs + Samples → share the file with the primary inspector
- The primary inspector imports each file: open the survey → Import / Export → select the received file → choose ADD → confirm
- After all imports, the primary inspector completes Background, Summary, and other narrative sections and generates the final PDF
Moving to a New Device
- On the old device: Settings → Manage Backups → + to create a full backup
- Open the backup card menu → Export to Device or Share to save it to a location accessible from the new device (Google Drive, email, etc.)
- On the new device: install the app from the Play Store, subscribe or restore your purchase, accept Terms & Conditions, and at the Setup Wizard welcome screen choose “I’m an existing user” to skip the wizard
- Settings → Manage Backups → Import from Device → select the backup ZIP
- Confirm both restore dialogs — the app restarts with all your data restored
Part 9 — Tips & Best Practices
On-Site Workflow
Recommended order of operations during a field inspection:
- Create or open the project and survey before leaving the office — or create it on-site during setup. Confirm the project number and client info are correct.
- Set your active sample prefix for the first area you are inspecting.
- Take exterior and site-wide photos before entering the building.
- Walk each room or area systematically. Add an HA for every suspect material: material description, category, location, condition, and quantity.
- For each HA, take a wide context shot showing where the material is in the room, then a close-up of the material itself.
- Add samples to each HA. Record the location with enough detail to find it again after the fact.
- Switch your active prefix as you move to a new floor or area.
- Use Field Notes to capture anything unusual — weather conditions, access restrictions, client conversations, or sampling decisions you may need to justify later.
- Before leaving the site, do a quick count: does the number of samples logged match the number of physical samples you collected?
- Tap Save in the action ribbon before closing the app to force an immediate write to the database.
Back-at-Office Workflow
Recommended order of operations after returning from the field:
- Review each HA — check descriptions, locations, and material categories. Fix anything entered quickly in the field.
- Add photo descriptions and confirm each photo is categorized under the correct type.
- Generate the COC and submit samples to the lab. See Generating a COC.
- When lab results arrive, open each HA and set Contains Asbestos status to the confirmed result. Enter the asbestos percentage for YES and ≤1% results. The Summary section findings update automatically.
- Open the Background section. Load and customize templates for each subsection. Check that all auto-substituted variables are correct for this survey.
- Write your Recommendations in the Summary section.
- Add any Custom Sections needed for this project type or client.
- Review Field Notes and move anything relevant to the formal report sections.
- Run Validate from the action ribbon to confirm all required Background fields are filled.
- Tap Make PDF, open the result, and read through the entire report before sending to the client.
QA Checklist
Before submitting a final report, verify the following:
- Every suspect material identified in the field has an HA in the app
- Each HA has a specific material description and a precise location
- Every HA has a Contains Asbestos status set (or is intentionally Awaiting Results for a preliminary report)
- All YES and ≤1% results have the exact asbestos percentage entered
- Sample counts meet AHERA minimum recommendations for each HA’s category and quantity
- All samples are linked to their correct HA
- All photos have descriptions and location captions filled in
- Photos that should not appear in the report have Include in Photolog unchecked
- HAs that should not appear in the report have Exclude from Report enabled
- Cover Page fields are complete and accurate
- All Background subsections are complete (Validate confirms this)
- Recommendations reference specific HAs where appropriate
- Standard section visibility in Custom Sections is correct for this report type
- Report Date is the delivery date, not the field survey date
- A test PDF has been generated and read through in full before delivery
- Field Notes reviewed — nothing there that belongs in the formal report